This is the first in a series of posts about programming simple games in C. You can see an index of all the posts in this series: go to index.
This series is called Games programming from the ground up with C because it charts my development of a series of games from the very simple and gradually increasing in complexity and introducing more advanced techniques and topics. For this series, I decided to explore game programming concepts by converting a series of games from the book BASIC Computer Games by David Ahl. If you’d like to find out more about this book, and how to run the games in it – you can read this earlier post. Here’s what my development environment looks like:
- a windows 10 desktop PC running Windows Subsystem for Linux (WSL) and an Ubuntu distribution. I also considered MingGW-w64 and Msys2 but decided that WSL2 and a genuine Linux distro was the way to go, especially for command line programs)
- the GNU Compiler Collection (GCC)
- the Vim text editor
- and for a version control system, Git and GitHub.
The first step was to install my chosen development tools.
You might be wondering, why C? Surely there are more modern languages that are a better starting point? Yes, possibly, but a lot of the most popular languages for games development, for example C++, C#, JavaScript, and Java, borrow syntactical or functional features from C, so by starting with C, transitioning to one of those languages later will be a lot easier. C is also a middle-level language, which means there’s not a lot of complexity standing between the code I write and the hardware it’s running on. For the very simple programs I’ll be starting with that’s a benefit, because it’s easy for me to see how the code I write is affecting the output I see and how the program is processing my input.
The first game I will convert is not really a game at all – it’s more of an amusement – but it does have the virtue of being simple. And simple is always a good place to start. The program is called Buzzword. It generates amusingly pompous, but meaningless, jargon that you can introduce into the conversation around the board room table or dining table to show colleagues, friends and family how extraordinarily erudite you are (sorry – how much you know ;-)). If you want to see the original source code, you can get it here:
Running the original BASIC program generates something like this:
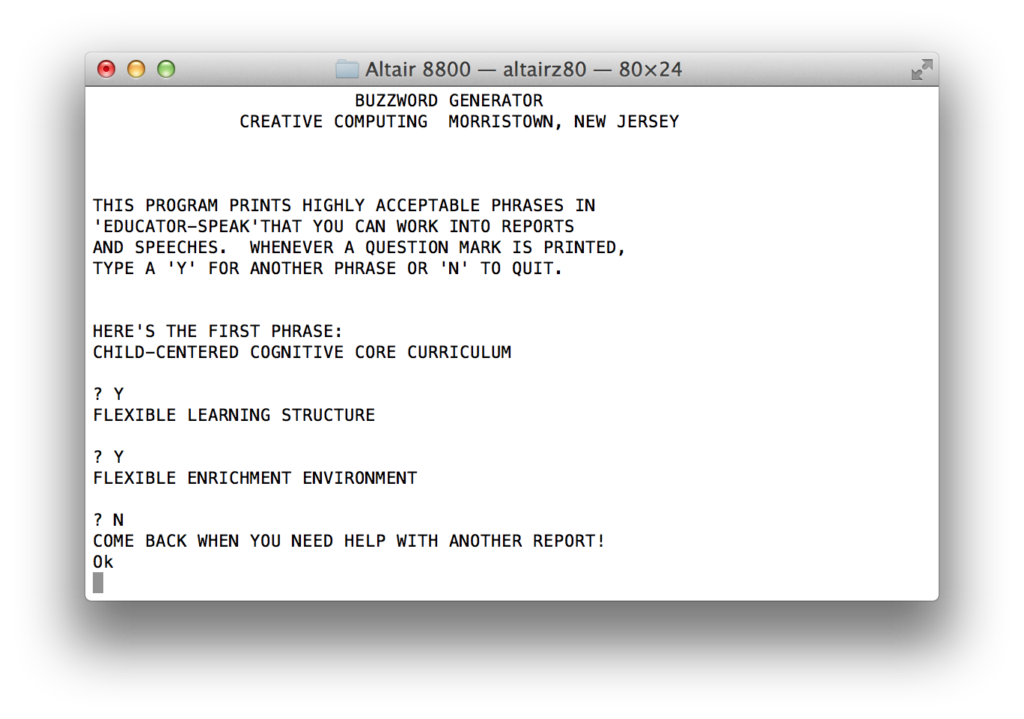
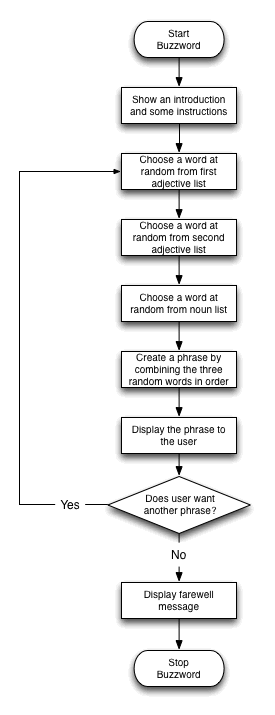
Each time you run it, it randomly picks one word each from three lists of words – two lists of adjectives and one list of nouns and then shows the resulting phrase to the user. The user then gets the opportunity to decide whether to see another phrase or exit the program. When approaching the design of any game, even one this simple, it always pays to map out the steps involved before you begin programming. A useful tool for doing this is a flowchart. In it’s simplest form this shows each step in a box connected with arrows to show the sequence. Decision points are shown with diamonds – here’s a simple flowchart I created for buzzword:
Having now planned what my program needs to do, I was ready to start the fun bit – programming in C. The C language has been around for a while now – almost fifty years in fact. And while it’s not the easiest language to learn, it’s one of the most successful. And it’s still used today to create many games (and other applications), so getting a good understanding of C made a lot of sense to me.
Programs in C are created initially as plain text files. So all I need to write one is a text editor of some sort. Before I started writing anything though I needed to get a couple of preliminary steps out of the way. Firstly, I needed somewhere to store all the programs I plan to create. I created a top-level directory called gpftguwc (short for Games programming from the ground up with C).
I’m a total convert to using a version control system of some sort. As I mentioned earlier, I’m using Git and Github. So the next thing I wanted to do was set up my program on the version control system.
Inside my top-level directory, I created a new directory called c-games-buzzword.
I got into that directory with cd c-games-buzzword.
Next I initialised a local Git repository with git init. Now I needed to set up a remote repository.
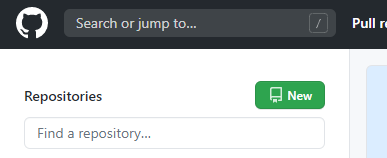
To use GitHub, I logged in to my GitHub account and on the GitHub dashboard, selected the New button at the top of the Repositories sidebar on the left.
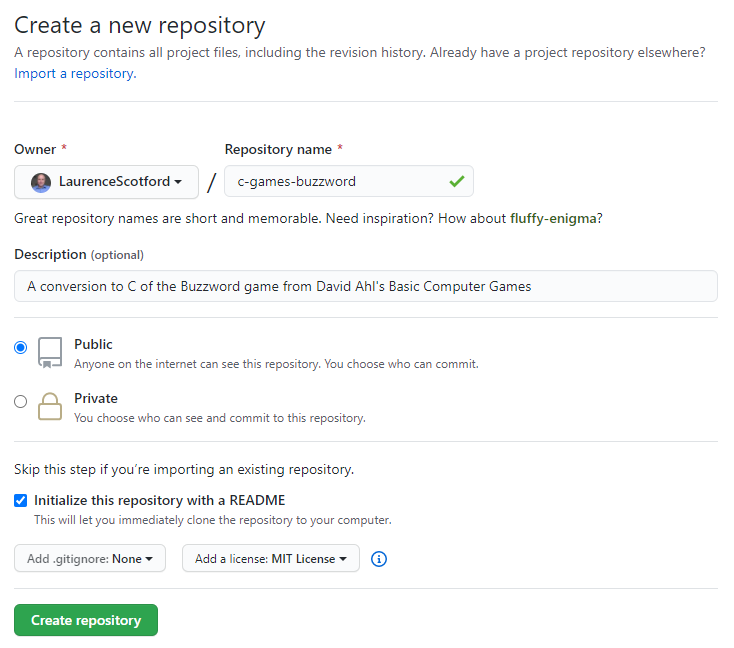
On the next screen, I filled in some details for the program.
- I entered a repository name – this must not include spaces.
- I entered a brief description.
- I selected Public – this means anybody can view my code.
- I checked the box that asks if I want to create a README – this creates a file that I can expand to describe the code to help visitors understand more about it and how to install and run it.
- A .gitignore file tells GitHub about any files that shouldn’t be included in the repository. For my first few games I’ll only have source files in the directories in my repositories so I didn’t need to worry about this. I left None selected in the Add .gitignore field.
- I think it’s sensible to always have a suitable license with my code. In this case, I selected MIT License. This is a fairly permissive license that gives people a lot of freedom of what they can do with my code. Later, if I’m developing something I intend to distribute, I might want to explore other licenses by clicking on the i symbol next to this field.
This is what I saw when I was finished:
I clicked Create repository. I then saw my initial repository with just two files that GitHub had created for me: LICENSE and README.md. Underneath the list of files I can see the contents of the README file.

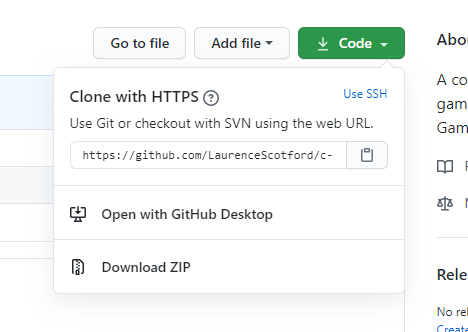
At that moment, the repository existed only on the GitHub server and was not linked to my local repository, so the next step was to do that. I clicked the green Code button. Then, in the pop-up, I clicked the clipboard icon next to the URL to copy it:
Back in the terminal (still in my buzzword directory), I entered git remote add origin [my repository URL]
That linked my local repository to GitHub, but now I needed to get the two files that GitHub created for me. I entered git pull origin master. When I then listed the files with ls, I saw the LICENSE and README.md files were now in my local filesystem.
Although I could not see it, this directory also contains a hidden directory called .git. This directory is used by Git to manage the repository – I don’t need to, and should not, make any changes to this directory.
OK now I was finally ready to start writing some code. I opened my text editor and created a new file, which I saved as buzzword.c in the c-games-buzzword directory.
This is what was in that first file:
/*******
 * Buzzword
 *
 * A program to create amusing fake jargon
 *******/

 #include <stdio.h>

 int main(int argc, const char * argv[])
 {
   printf("Hello, World!\n");
   return 0;
 }
This is actually a fully functional C program. It’s something of a tradition when learning programming, that your first ever program displays the message “Hello, World!”. This tradition was started by Brian Kernighan, who was one of the authors of the first book to describe the C language I’m exploring.
So, having done all that hard work to get to this point, I was anxious to see this program running. Although the program is written in plain text, and makes a lot of sense to humans (at least it does, once you understand a bit of C code), it’s not so useful for machines in this format. Although there are many different languages that can be used to program your computer, it really only understands one. This is called machine code, and it’s a series of numbers that represent the instructions the computer’s CPU is able to carry out. Programming directly in machine code, which is known as a low-level language, can be done, but it is a very difficult and time consuming process. Instead I use a higher-level language, like C, which is easier for me to understand, and then convert this to the equivalent machine code that the computer can run. With C, I do this using a process called compilation. This process involves another program, called a compiler, reading all the files and then translating them into the equivalent machine code.
There are a few steps I needed to take to get ready to compile this first program:
- In the terminal, from within the c-games-buzzword directory, I entered gcc buzzword.c -o ../buzzword (NOTE: that’s a lower case letter o not a zero. In case you’re wondering, I used ../ to ensure the executable was created in the top level directory. You’ll see why later.)
- I entered cd ../buzzword
- The computer responded by displaying Hello, World! on the next line of the command prompt.
Awesome! I’d just compiled and run a first C program. See the image below for what that looked like.

If, when I’d compiled, I’d seen something like the image below, then I’d have made an error when I entered the program. In this case, the only thing to do is go back to the editor and correct the error, then save it and try again.
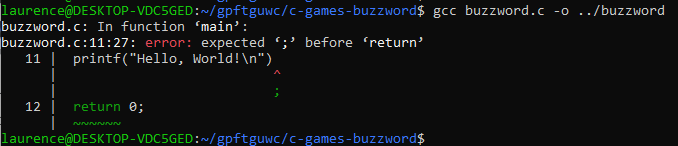
So, what did I do here? gcc is a compiler. When I entered gcc buzzword.c I asked the compiler to compile my C code in that file (this is known as our source file). I added the next part of the command -o ../buzzword to tell the compiler what to call the output file (the executable) and where to put it. The two dots and backslash told the compiler to place this file in the parent directory. The reason I did this was to avoid having the executable file in my source directory. Read on to find out why this was a useful thing to do.
Whenever I make any significant changes to my source files, those changes exist only on my local file system on a single set of files. What if I make a change that doesn’t go well and I want to revert the file back to its original state? I’d have to remember the changes I made or trust to the undo functionality in my editor. By using a version control system, it’s easier to maintain multiple versions of my source files so I can easily roll back to an earlier version. But to take advantage of that functionality, I first have to create a version in my version control system. I do this by committing the changes I’ve made.
In the terminal, I entered git status. I saw the following:
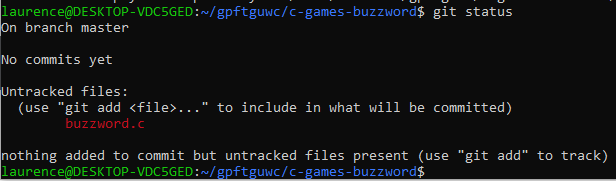
Git tells me that the file I’ve created is currently untracked – meaning it’s not in the repository. If I’d allowed my compiler to also store the executable file in this location, it would also have been listed here as a new file. My source repository should never include output files from compilation processes. That’s why I included ../ to instruct the compiler to place the output executable in the parent directory instead. There is another way around this (using the .gitignore file that was an option given to me by GitHub earlier), and I’ll explore this in a later post.
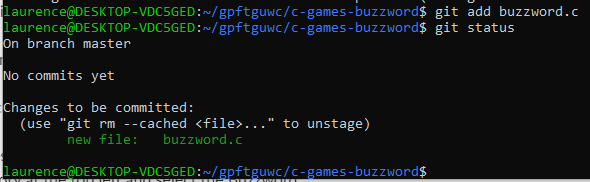
To add the buzzword.c file to the repository, I first need to stage it. To do this, I entered git add buzzword.c. When I entered git status again, I saw that the file was now listed as a change to be committed (which means it had been staged).
The next step was to commit the change to the repository. To do this, I entered git commit -m “Create buzzword.c”

The -m option adds a message to help me identify the purpose of that commit. Git creates its own unique identifier for each commit, but these are not exactly human friendly, so I want to be sure to enter a brief message explaining what each commit does.
I ran git status again and could see that there was no longer anything to commit. There was one last thing left to do, and that was to push the changes I made to the remote repository at GitHub. To do that, I entered git push origin master.
Once that was done, I opened up my home page in GitHub in a browser and selected the Buzzword repository. I could see that commit had been added.

In the next part of this series I’ll explain in detail what this Hello World program is doing and I’ll start modifying this template to make the Buzzword program. In the meantime, here’s a couple of things I had to think about.
- How would I change the program so it displays something other than “Hello, World!”, e.g. my name?
- What do the the characters \n do at the end of the message? The best way to find out this sort of thing is just to try experimenting, e.g. moving them to the beginning of the message (just after the opening quotation mark) or to the middle of the message (e.g. just after the comma) and then build and run and see what happens.
Be First to Comment