You can see an index to all the posts in this series: go to index.
In the previous post I set myself a final challenge for the Buzzword program, which was to create a version that worked both with and without command line arguments.
Here’s my solution:
/*******
 * Buzzword
 *
 * A program to create amusing fake jargon
 *******/

 #include <stdio.h>
 #include <stdlib.h>
 #include <time.h>
 #include <errno.h>

 // Function declarations
 void displayUsageAndExit();

  int main(int argc, const char * argv[]) {

  int numberOfPhrases = 1;  // The number of phrases to display

  // The mode of operation: 0 = single phrase then prompt for more, 1 = display number of phrases requested in the command line arg
  int mode = 1;

  if (argc == 1) {
     // There was no argument so set mode to single phrase with prompt
     mode = 0;
   } else if(argc != 2) {
     // An incorrect number of arguments was given, so quit with usage message
     displayUsageAndExit();
   } else {
     // A single argument was given, so attempt to convert it to an integer
     errno = 0;
     char * inputStr;
     long inputNum = strtol(argv[1], &inputStr, 10);

     if(errno == ERANGE || *inputStr != '\0' || inputNum < 1 || inputNum > 99) {
       // The argument could not be interpreted as an integer in the required range, so quit with usage message
       displayUsageAndExit();
     }

     numberOfPhrases = (int) inputNum;
   }

   // Display the introduction and instructions if required
   printf("Buzzword Generator\nBased on a program from Creative Computing, Morristown, New Jersey\n\n\nThis program prints highly acceptable phrases in 'educator-speak' that you can work into reports and speeches.");

   if (mode == 0) {
     printf(" Whenever a question mark is printed, type a 'Y' for another phrase or 'N' to quit.\n\n\nHere's the first phrase:\n");
   } else if (numberOfPhrases == 1) {
     printf("\n\n\nHere's your phrase:");
   } else {
     printf("\n\n\nHere are your %i phrases", numberOfPhrases);
   }

   // Create three lists of words
   const char * adjectives1[] = {"ability", "basal", "behavioral", "child-centered", "differentiated", "discovery", "flexible", "heterogeneous", "homogenous", "manipulative", "modular", "tavistock", "individualized" };
   const char * adjectives2[] = {"learning", "evaluative", "objective", "cognitive", "enrichment", "scheduling", "humanistic", "integrated", "non-graded", "training", "vertical age", "motivational", "creative"};
   const char * nouns[] = {"grouping", "modification", "accountability", "process", "core curriculum", "algorithm", "performance", "reinforcement", "open classroom", "resource", "structure", "facility", "environment"};

   // Seed the random number generator
   srand((unsigned int)time(NULL));

   char rawInput[80];  // This will hold the raw input entered by the user
   char input;   // This will store the character entered by the user

   // Display random phrases while user keeps requesting them
   do {
     for (int i = 0; i < numberOfPhrases; i++) {
       printf("\n%s %s %s\n\n", adjectives1[rand() % 13], adjectives2[rand() % 13], nouns[rand() % 13]);
     }

     if (mode == 0) {
       printf("?");
       fgets(rawInput, sizeof(rawInput) / sizeof(rawInput[0]), stdin);
       sscanf(rawInput, " %c", &input);
     }
   } while (mode == 0 && (input == 'y' || input == 'Y'));

   printf("Come back when you need help with another report!");

   return EXIT_SUCCESS;
 }

 void displayUsageAndExit() {
   printf("\nUsage: BUZZWORD number_of_phrases\nWhere number_of_phrases is an optional argument - a whole number from 1 to 99\n");
   exit(EXIT_FAILURE);
 }
The first thing to notice is that I’m now setting two variables at the start of the main function.
- numberOfPhrases, (on line 17) which you’ve seen before, holds how many phrases the program should display. Note that I’m giving this a default value of 1. This default value is important as you’ll see in a moment.
- mode (on line 20) is a new variable. This indicates which mode the program is working in. It will be set to either 0 (if there was no command line argument and the program is displaying single phrases and asking the user if they want more after each one) or 1 (if it’s displaying the number of phrases requested on the command line). 1 is the default value.
Most of the code for processing command line arguments is the same as you’ve seen before. The difference is on line 24, where I’m setting the mode to 0 if no command line argument was given.
On line 43 I now display the introductory text. Lines 45 to 51, determine what is displayed next.
- If the program is in mode 0 it displays an instruction to the user on how to request another phrase and then introduces the first phrase.
- If it’s in mode 1 and a single phrase has been requested, it simply introduces that single phrase.
- The else code block will run in all other cases, which will be that the program is in mode 1 and more than 1 phrase has been requested. In this case it will introduce however many phrases have been requested.
There are some subtle differences now in how the looping works. Firstly, note that I now have two loops, an outer do… while loop and an inner for loop.
Let’s look at the inner for loop first. This simply displays the number of phrases set by the variable numberOfPhrases. Note that, because I set a numberOfPhrases to a default of 1 back in line 17, if the program is in mode 0, this loop will correctly display just a single phrase. If, however, it’s in mode 1, numberOfPhrases would have been set to the requested number in line 39.
The outer do … while loop will continue to display phrases as long as the user keeps requesting them. The second part of the condition on line 75 should be familiar to you, as it is checking whether the first letter entered by the user is ‘y’ or ‘Y’. Notice though that there’s an additional check first to make sure that the program is in mode 0. Because the two parts of the condition are combined with a logical AND (&&), if the program is in mode 1 (command line argument supplied), the condition will instantly fail and the second part will not be checked (remember the short-circuiting principle?).
Also note that within this loop, on lines 70 to 74, the code that displays a prompt and reads the keyboard input is now enclosed in an if statement, so it will only be executed in mode 0.
The final minor change, is to update the usage statement in line 83 to make it clear that the command line argument is optional.
Before I commit these changes to Git, there’s one more file I want to update, that I’ve ignored up to now. That’s my README file. The README file should not only describe my program, but should also include instructions for how to compile and run it.
If I look at my local files, I can see that this file has an extension of md. That indicates this is a markdown file. Markdown is a type of markup language, which is a system for adding inline annotations to a plain text document to signify formatting or to create a semantic structure. HTML is another type of markup language. Markdown has an informal specification, which means there are lots of different variants. In this case I’ll be using GitHub Flavored Markdown.
I opened the README.md file in my editor. Some editors, also have a handy feature to let you preview how the markdown will be rendered. For example, here’s the markdown preview in the popular Atom editor.

Looking at the file, I can see it currently contains just two lines, the name of the repository and a single line description. Notice that the first line begins with a single hash or pound symbol (#). If I look at the preview, I see that this symbol doesn’t appear but it has made that line larger and bold.
The # symbol at the start of a line is used to denote a heading. I can also have subheadings by adding further # symbols. To see how this works, at the bottom of the file I added another line:
## How to compile the program
This has created a second level heading that is a little smaller than the main heading. I could add additional # symbols to create a third level heading (###), fourth level heading (####) etc. Markdown will support up to 6 heading levels.
I can also use markdown to change how parts of my text are displayed. For example, let’s say I want the book title in line 2 to be emphasised, I can do this by putting an asterisk (*) either side of the relevant text:
A conversion to C of the Buzzword game from David Ahl's *Basic Computer Games*. Buzzword prints highly acceptable phrases in 'educator-speak' that you can work into reports and speeches.
Note that I’ve also added to this text to explain what the program actually does.
You might be wondering what happens if I just want to show an asterisk as part of my text. Well, do you remember escape sequences in C? Markdown uses the same mechanism. I can escape the * character the placing a backslash (\) in front of it: \*. Similarly, if I want to display a backslash, I simply escape it with another backslash: \\.
Here’s an example of a complete md file:
# c-games-buzzword
A conversion to C of the Buzzword game from David Ahl's *Basic Computer Games*. Buzzword prints highly acceptable phrases in 'educator-speak' that you can work into reports and speeches.
## How to compile the program
Buzzword consists of a single file, *buzzword.c*. Simply compile this to create an executable.
## How to use Buzzword
Buzzword takes an optional command line argument, an integer between 1 and 99 that indicates how many phrases you would like to generate. For example, if you compiled the program to create an executable called "buzzword", you could generate 5 phrases with:
```
buzzword 5
```
If you run the program without a command line argument, it will display a single phrase and then display a question mark and wait for your input. Entering **y** or **Y** then hitting the enter or return key will display another phrase. Entering any other character and hitting enter or return will end the program.
There are a couple of new things you haven’t seen here. The three back ticks (`) on lines 7 and 9 are used to mark the beginning and end of a code block. The double asterisks (**) on line 10 are used to mark text that I want to have a strong emphasis.
That’s it. I’m now done with Buzzword (although there’s certainly many other enhancements that could be made if I was so inclined). All that’s left is is to commit my changes and push them to GitHub. Note that this commit, completes the merge I started in the last post.
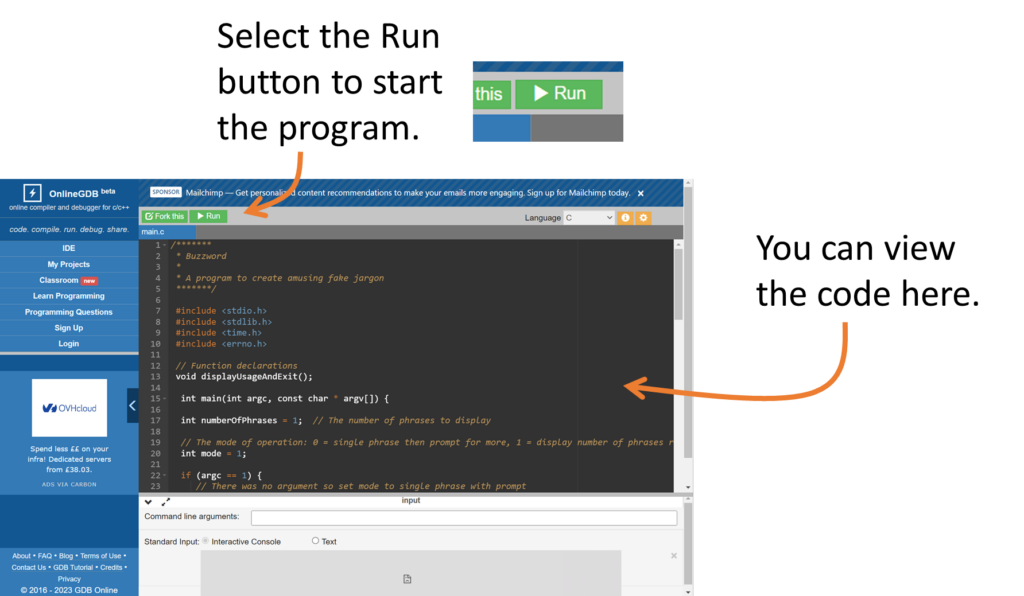
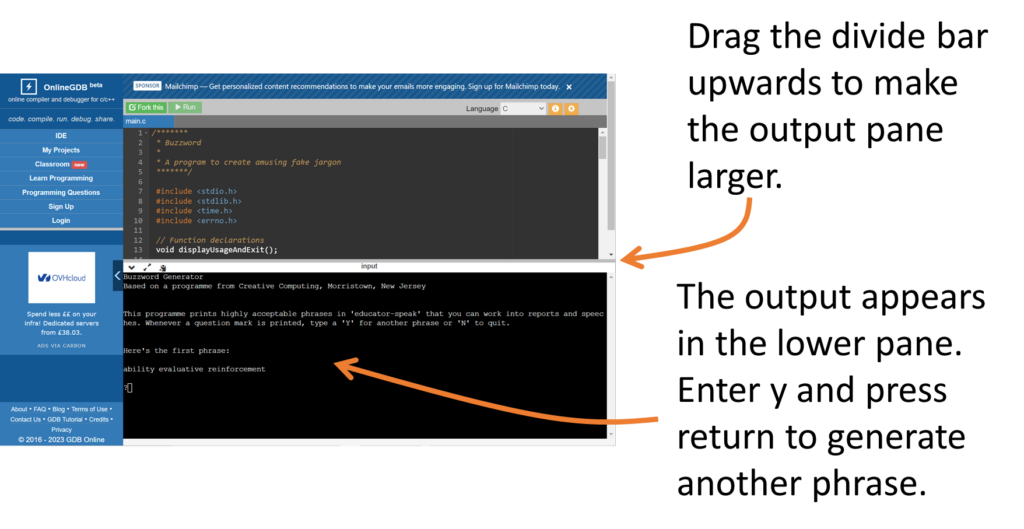
You can play the game in OnlineGDB, a web-based compiler and runtime environment.
In the next post, I’ll introduce a challenge project to create another command-line program, and this one will be a proper, albeit simple game using all the techniques covered so far.
Be First to Comment