You can see an index of all the posts in this series: go to index.
If you want to review my progress, here are the files from the end of the previous post: links and images.
In the previous post, I left myself with a couple of challenges. The first of these was to decide whether the image element is a block-level element or an inline element.
To demonstrate the answer, I created a short html file, as follows:
<!DOCTYPE html>
<html lang="en" dir="ltr">
  <head>
    <meta charset="utf-8">
    <title>Image - block-level or inline</title>
  </head>
  <body>
    <p>Here is some text <img src="images/block-level-or-inline.png"> surrounding an image.</p>
  </body>
</html>
Line 8 is the important one here. It consists of a single paragraph element with some text either side of a small (50 pixels x 50 pixels) image. If I open this in a browser, this is what I see:
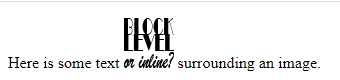
So there I have my answer – the image element is an inline element.
The second challenge was to add the link from the second question in my quiz to the page with its answer and the third question. This one wasn’t too much of a stretch. I have added a single line at the end of the body, like this:
<p><a href="question3.html">See the correct answer and question 3</a></p>
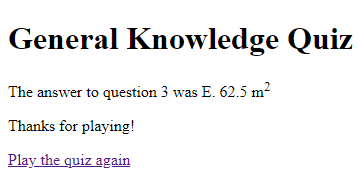
The final challenge was to create an entire web page, called finalpage.html to show the answer to the third question. Here’s my solution:
<!DOCTYPE html>
<html lang="en" dir="ltr">
  <head>
    <meta charset="utf-8">
    <title>General Knowledge Quiz - Answer to question 3</title>
  </head>
  <body>
    <h1>General Knowledge Quiz</h1>
    <p>The answer to question 3 was E. 62.5 m<sup>2</sup></p>
    <p>Thanks for playing!</p>
    <p><a href="index.html">Play the quiz again</a></p>
  </body>
</html>
That final page looks like this in a browser:
OK, I have a complete, somewhat short, quiz now, but it isn’t going to win any prizes for looks. The problem I’m facing is that plain HTML on its own is intended to do just two things:
- contain the content to be displayed to page visitors
- apply a structure to that content.
HTML is not at all concerned with the presentation of that content. And as you can see, left to its own devices, my browsers isn’t making much of an effort to make my HTML content look pretty.
Fortunately, I can take matters into my own hands with style sheets. A style sheet is a separate document that instructs the browser on how to present the content of an HTML page.
The style sheets I will create use a style sheet language called Cascading Style Sheets (more commonly referred to as CSS).
Before I create my first style sheet, I need somewhere to put them. I created a new folder inside my quiz folder and called it css. Inside that folder, I used my text editor to create a new file called quiz.css.
Within my new CSS file, I entered the following text:
body {
  font-family: Arial, sans-serif;
}
At the moment, just creating this file won’t have any effect on my pages. I first need to link my pages to this CSS file. In index.html I made the following change in the head element.:
  <head>
    <meta charset="utf-8">
    <title>General Knowledge Quiz</title>
    <link rel="stylesheet" href="css/quiz.css">
  </head>
The link element is a general purpose way of linking my HTML file to external resources. Because it’s general purpose, I need to tell it what relationship the resource has to the page. I do this with the rel attribute. In this case, rel=”stylesheet” tells the page to use the linked document as a style sheet. You should recognise the href attribute as I’ve already used it with the anchor element. It works exactly the same way here.
After this change, the page looks like this in the browser:
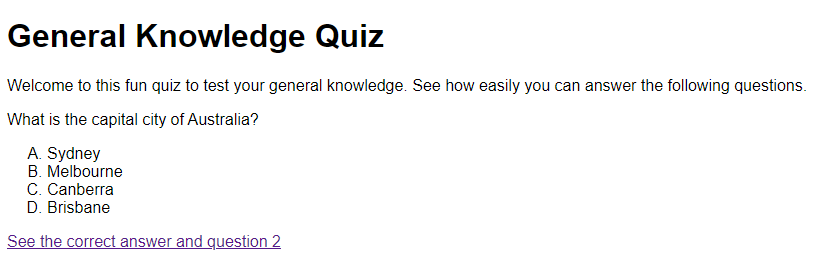
Wow! That horrible serif font has been replaced with a nice clean sans-serif font. But when I click the link – oh horror of horrors – the serifs are back again! I have to explicitly link the style sheet to every page I want to use it with. After I’ve done that I can see that all the pages have the sans-serif font.
Let’s look at the CSS file again to see what it’s doing.
body {
  font-family: Arial, sans-serif;
}
A CSS file consists of a series of rules about how to style the elements in an HTML file. Each of these rules has two parts. The first part is called a selector, because it is used to select the parts of the document to apply the rule to. For this rule, the selector is body. When I use the generic name of an element as a selector it means that this style will be applied to all instances of that element.
The second part of the rule is a list of declarations. The declarations are what specify the style to apply. Declarations are placed between a pair of curly braces that follow the selector. Each declaration consists of a CSS property followed by a colon, followed by the value to set that property to and ending with a semicolon.
So in this example:
- font-family: Arial, sans-serif; is the whole declaration
- font-family is the CSS property I am setting
- Arial, sans-serif is the value I am setting it to
As you have no doubt already realised, this property specifies the font to be used within the selected parts of the document. Why font-family, rather than just font? That’s because the font may not be a single typeface but could include a family of related typefaces, for example bold or light versions of the regular font.
So in this declaration I’m instructing the browser to use the Arial font family for the body element. Notice that this is followed by a comma and then sans-serif. One potential issue with developing for the web is that the fonts available to a browser will depend on the system that the browser is running on. Rather than have everything go horribly wrong if the preferred font isn’t available, font-family allows me to specify a list of fonts in order of preference and separated with commas. It also allows me to specify a generic font type rather than a particular font. So the sans-serif here is specifying any font that is a sans-serif type. Other generic types are serif, cursive, fantasy and monospace. It’s always a good idea to specify at least one backup font and to end my list with a generic type.
My declaration then is essentially an instruction to use the Arial font family for the body element but to fall back to any sans-serif font if Arial isn’t available.
Let’s see how much I can transform my web pages with a few lines of CSS. I changed my CSS file to look like this:
body {
  font-family: Arial, sans-serif;
  max-width: 600px;
  margin: 0 auto;
}

h1 {
  text-align: center;
  background-color: #337788;
  color: white;
  border-radius: 20px;
}

a {
  background-color: #337788;
  color: white;
  padding: 6px;
  text-decoration: none;
}

a:hover {
  background-color: #4499aa;
}
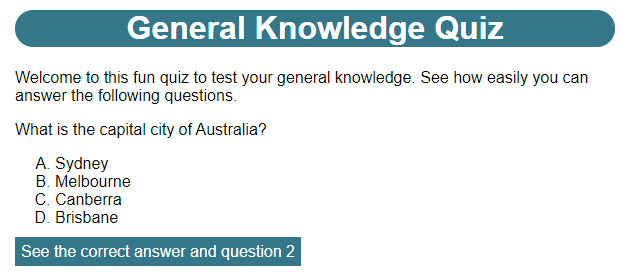
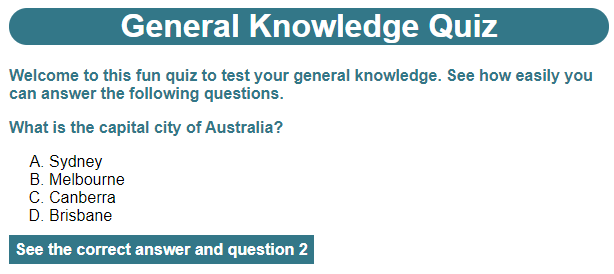
Now, when I save the file and refresh the page in the browser, this is what I see:
One thing I need to watch out for with CSS, is that, If I’m seeing something that looks drastically different to what I expect, the chances are I’ve introduced an error by missing a colon or semi-colon or by typing a property name or value incorrectly.
So the first thing to notice is that the content now occupies a relatively narrow column in the centre of the page. This is achieved by the two additional declarations I’ve added to the body selector. The max-width: 600px declaration sets the maximum width for the body to 600 pixels, but it will allow it to become narrower, for example if you were looking at the page on a phone. The margin property sets how large a margin should be left around the outside of the element. I can set this property with 1, 2 or 4 values separated by spaces, as below:
- 1 value – applied to the margin on all four sides
- 2 values – first value is applied to the top and bottom margins, second value is applied to the left and right margins
- 4 values – first value is applied to the top margin, second to the right margin, third to the bottom and fourth to the left.
I can also set each of the margins individually by using the margin-top, margin-right, margin-bottom and margin-left properties. You’ll see this pattern a lot with CSS properties.
So the declaration margin: 0 auto; is setting the top and bottom margins to 0 and the left and right margins to auto. A value of 0 simply means no margin, while a value of auto sets the value of the property automatically based on the context. In this case it subtracts the width of the element from the available width and then divides the remainder between the left and right margins, which has the effect of centring the element.
You can see my heading is now white text on a pleasant blue-green background. I can specify the text colour with the color property (for those of you used to UK or Australian spellings, note that I need to use the American English spelling in my CSS), and the background colour with background-color property. There are several ways to specify colours in CSS and you can see two of them here. I’m setting the color property by using a recognised colour name, white. You can see a list of all of these here. I’m setting the background-color using a hexadecimal colour value, #337788. This consists of a hash followed by three pairs of hexadecimal digits with each pair representing the value for red, green and blue respectively. If you’re not sure what a hexadecimal digit is, and you want to know, here’s an explanation.
The text-align property, as it suggests, sets the text-alignment. Here, I’ve centred the heading with text-align: center; (Again, note Imust use the American English spelling here).
The final thing I’ve done with the heading is set a border-radius of 20 pixels. This is what is giving the heading background it’s nice rounded ends.
The final change I’ve made is to the anchor element. To make this look more like a button than a link, I’ve used the same color and background-color values as I have for the headings. You’ve seen that the margin property creates a space around the outside of the element. The padding property works in a similar way, but it creates a space between the edges of the elements and its content. By giving it a single value of 6 pixels, this is applied to the padding on all four sides. This has the effect of extending the background colour a little way beyond the edge of the text. The text-decoration: none; declaration stops the browser from showing an underline, even though this is a link.
You’ll have noticed that there appear to be two rules targeting the anchor element (a) but the second one is a:hover. The :hover part is called a pseudo-class. It’s a way of applying the rule only when the element is in a certain state. In this case, it will be applied whenever the mouse cursor is hovering over the element. In a browser it has the effect of making the background lighter whenever I move my mouse cursor over the link, making it even more button like.
There’s one more visual change I’d like to make to my HTML pages, and that’s to make the question appear in the same turquoise colour and bold. You can see that the question is within a paragraph element, so I added the following rule to the end of my CSS file:
p {
  color: #337788;
  font-weight: bold;
}
The color property is familiar to you now. The font-weight property is used to specify a bolder or lighter version of the font.
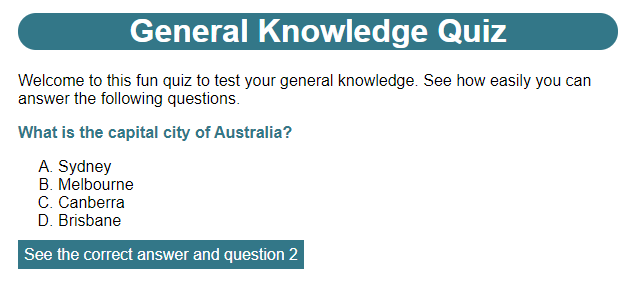
However, when I reload the page in the browser, I see this:
Hmm… not quite what I planned. I only wanted the question to be bold and turquoise, not my introductory text as well. This is happening because my introductory text is also a paragraph element so the same rule is being applied. How do I get round this?
Fortunately HTML allows me to classify elements so I can refer to them more specifically. I made the following change to my index.html file.
<p class="question">What is the capital city of Australia?</p>
I’ve now used the class attribute to make this element a member of a class called “question”. I can now refer to this class specifically in my CSS file. I changed the p selector in my quiz.css file as follows:
.question {
  color: #337788;
  font-weight: bold;
}
Rather than selecting a generic element, like p, I am now selecting a specific class called question. Note that class selectors always begin with a period or full stop (.) immediately followed by the class name.
When I refresh the page again, I see that the bold and turquoise colour is now correctly applied to just the question.
I’ve barely scratched the surface of CSS in this post, but hopefully that’s given you a taste of how powerful it can be in transforming my web pages. I’ll be coming back to CSS frequently in this series and using even more powerful features.
Before that I need to address a serious deficiency with this quiz – it’s not at all interactive! In the next post I’ll show you how I brought the quiz to life with some interactivity.
In the meantime, here’s an outstanding task I need to complete. At the moment, if I navigate to the second or third question, the question text will still be in the plain text style. I need to make the required change to the question2.html and question3.html files so that the question text appears in the correct style.
Be First to Comment