NOTE: The game described below was created in Scratch 2 – so some of the features of the Scratch environment that are discussed in this post might not apply to Scratch 3.
If you’re interested in all things code, you’ll almost certainly have heard of Scratch. It’s an online programming environment in which you can make games and animations. The first version of Scratch was created in 2003 and the first public version of it appeared back in 2007. Up until version 2.0 it was built using Adobe Flash, but version 3.0, which appeared in 2019, was completely rewritten in HTML5 and JavaScript . What makes Scratch different from most other programming environments is that it is entirely visual.
You build programs by dragging sprites onto a virtual stage and then creating scripts for them by dragging blocks representing different functions and plugging them together (sort of like programming meets LEGO). The obvious advantage of creating scripts visually is the speed with which you can create and the ease of experimentation. A less obvious advantage, but one that makes Scratch ideal for kids learning to program, is that, because typing is almost non-existent in Scratch, syntax errors are not something you have to worry about. In fact many structural errors are also eliminated because blocks will only fit with other blocks when it makes sense for them to do so.
Although you can create and import your own sprites, backdrops and sounds, Scratch also comes with a library of existing assets. This means you can be up and running with a new game or animation in a matter of minutes. Once a game or animation has been created, it can be shared with other members of the Scratch community. One of the most fun features of Scratch is that, if you find something you like, you can create a copy of it in your own account area and remix it to create something new – kind of like a scratch mix in music (hence the name).
The scratch community has millions of members from across the globe who have created millions of projects between them. That makes Scratch an enormous success as a channel for self-expression through programming.
Given the ease with which projects can be created in Scratch, it would be too easy to dismiss it as child’s play. And although it is ideal for kids, and the vast majority of Scratch users are below the age of 20, there is also a thriving community of older Scratch users. Many of the projects being created, by young and old alike, are extremely sophisticated.
When I first encountered Scratch, I decided to dip my toe in the water and see what could be done. I set myself some parameters for a game I could make. It should be something simple and easy to play, but also something that would have been non-trivial to program from scratch in HTML (pardon the pun). It should also involve the complexities of a level progression system.
So I created the first levels of a potentially much longer game. Having long been a fan of Pop Cap’s Zuma games I started to think along the lines of a game with a similar mechanic. This led me to thinking that it would be quite fun to retain the rotating frog at the centre of the play field but, instead of it shooting balls, it should shoot out its tongue to catch different coloured bugs.
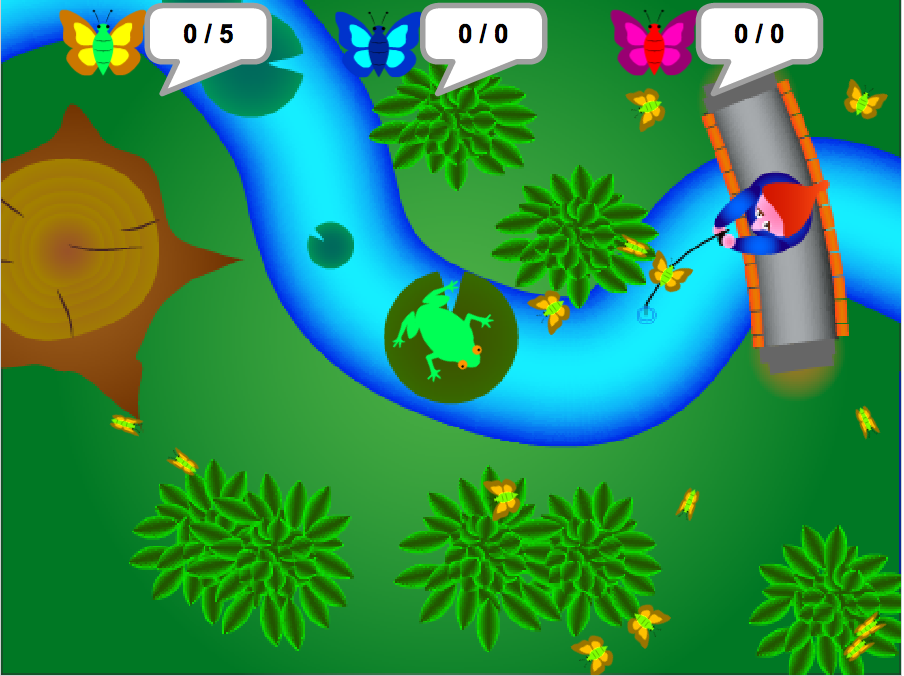
If you’d like to play the finished game, you can do so at this link:
http://scratch.mit.edu/projects/21625027/
My first task was to make the sprites and backdrops. Scratch has a nice editor with both a bitmap and vector mode. However, I chose to create my sprites and backdrops in Adobe Illustrator and then import the backdrops as PNG files and the sprites as SVG files, so they would be scalable. One minor problem with the SVG files was that, whatever changes I made to the format, they always lost the colour palette, so the sprites would be completely black, like silhouettes, when imported into Scratch. Fortunately, you can still select the individual shapes in the Scratch editor, so it is a fairly simple matter to recolour them there.
The next major hurdle was implementing the tongue mechanism for the frog. Because the tongue could shoot out to any point on the screen, I needed a sprite that could be scaled in only one direction. Unfortunately, although sprites in Scratch can be scaled, the width and height have to be scaled uniformly. The solution was to use Scratch’s pen feature. This allows a sprite to be used as a brush for drawing lines. By creating a single square portion of the tongue and then using this as a brush to repeatedly draw and erase a line between the frog’s body and the tip of the tongue (which is another sprite), I could create the illusion of a solid tongue shooting out to catch the bugs.
Here’s the tongue sprite and the scripts that control it:

Because most scripts in Scratch are attached to the sprite they operate on (some scripts can also be attached to the stage), communication between scripts for different sprites is effected by the use of messages. Messages are broadcast globally to all scripts, but scripts must be programmed to listen for a specific message. You can see two examples of this in the scripts above, one of which listens for the TongueOut message and the other of which listens for the stopDrawing message. Both these messages are broadcast by scripts attached to other objects.
The other tricky aspect was the level progression structure. With most languages, complex data like level data would be stored in structures or objects. With Scratch you have two forms of storage for data – variables and lists. A list in Scratch is like a single dimension untyped array in another language. This means the only real option for level data was to store it in a list. The image below shows the list with the level data for the first couple of levels in the game.
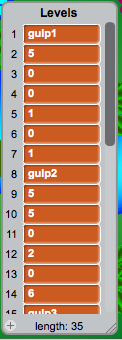
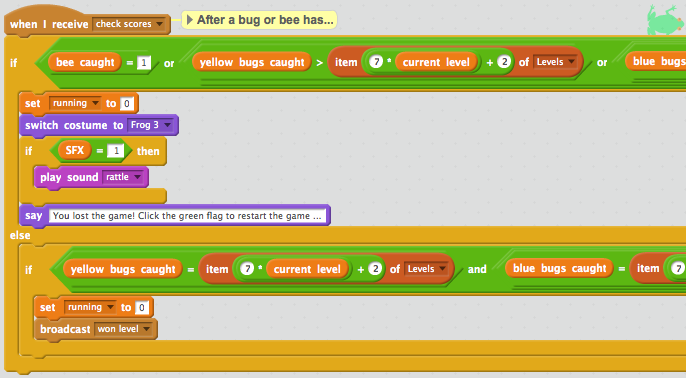
Level data is structured such that, if the levels are numbered from 0, the data for level n can be found at n * 7 + offset, where offset is the position of the particular data you are after for that level. For example, the name of the backdrop for the level is at offset 1, the number of yellow bugs to be caught is at offset 2, the code for the types of bug to be found on the level is at offset 5 and so on. This leads to some quite convoluted expressions to access particular items of data, as can be seen in the fragment of the script below, where the expression Item 7 * current level + 2 of Levels is used to get the number of yellow bugs required to complete the level:
So the reality is that it is possible to create some relatively sophisticated game mechanics in Scratch, but sometimes an oblique approach is required to overcome the very features that make Scratch easy to use. Which is, of course, exactly as it should be, since to supply more powerful mechanisms like structures or multi-dimensional arrays would be to defeat Scratch’s purpose of introducing new people to programming in a fun way.
Whatever your age, if you haven’t yet experimented with Scratch, I urge you to do so. It’s a lot of fun and, if you’re new to programming, a great way to build some skills.
Be First to Comment