You can see an index of all the posts in this series: go to index.
If you want to review my progress, here are the files from the end of the previous post: style sheets.
In the previous post, I left myself with a simple task, which was to change my question2.html and question3.html files so that the question appeared in the same style as the question in index.html. The solution is to add the class question to the paragraph element holding the question. So in question2.html, for example, it looks like this:
<p class="question">Which of the following are national languages of Switzerland?</p>
I also identified that, given this series is all about creating games, my quiz is totally lacking in interactivity at the moment. So how do you interact with an HTML page? Well one way is through forms. You’ve almost certainly interacted with an HTML form before – probably on many occasions, for example, when you log in to a website.
So I’ll turn my question in index.html into a simple form. I updated my file to look like this (the lines I’ve changed are highlighted):
<!DOCTYPE html>
<html lang="en" dir="ltr">
<head>
<meta charset="utf-8">
<title>General Knowledge Quiz</title>
<link rel="stylesheet" href="css/quiz.css">
</head>
<body>
<h1>General Knowledge Quiz</h1>
<p>Welcome to this fun quiz to test your general knowledge. See how easily you can answer the following questions.</p>
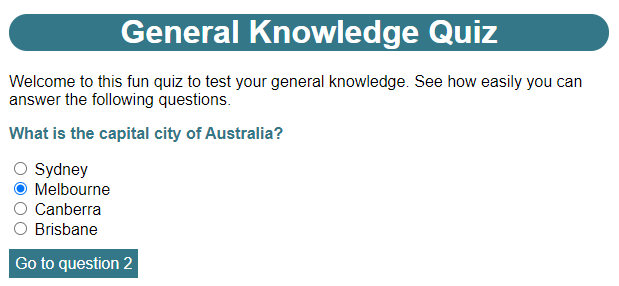
<p class="question">What is the capital city of Australia?</p>
<form>
<input type="radio" id="option1" name="answer"> <label for="option1">Sydney</label><br>
<input type="radio" id="option2" name="answer"> <label for="option2">Melbourne</label><br>
<input type="radio" id="option3" name="answer"> <label for="option3">Canberra</label><br>
<input type="radio" id="option4" name="answer"> <label for="option4">Brisbane</label><br>
</form>
<p><a href="question2.html">Go to question 2</a></p>
</body>
</html>
So the first thing to note about this is that my ordered list element (ol) has now been replaced by a form element. I’ll come back to the function of the form element in a short while. Inside my form, where I used to have my list items (li), I now have lines with a series of the three elements, input, label and br. Let’s take these one at a time.
The input element is a generic element that uses a self-closing tag for creating form fields. Because it’s generic, I have to use it with a type attribute, which indicates which type of field it is. The type I’m using here is radio, which indicates a radio button. Radio buttons are so called because they mimic the band selector buttons on old fashioned radios. These buttons would let you have only one button depressed at a time. If you pressed another button, the currently depressed button would pop back up.
When I open the page in a browser I can see this at work. When I click on one of the items, then click on a different item, I see the item I selected previously is now deselected.
I don’t get this behaviour for free though. The browser needs to know which radio buttons are grouped. The way I do this is by using the name attribute and giving them all the same name, which in this case is answer. I tried giving one of them a different name to see what would happen when I clicked them all, and sure enough the button with a different name was not affected by the others.
The last attribute in the input element is id. Every element on an HTML page can optionally be given a unique ID, which I specify using the id attribute. Note that it’s up to me to make sure that the IDs I use genuinely are unique. If I use the same ID for two different elements, the page will still load and render but might not work quite as I expect. The are several ways in which the id attribute comes in handy. One of these is related to the next new element, label.
The label element, as you have no doubt guessed, encloses the label for a form field. HTML doesn’t force me to have the label for a form field right next to the field – it could be above it or below it for example – there might even be some other content (for example an instruction) between the label and its field. Because of this, the browser needs a way to associate a label with a particular field. I do this with the for attribute. This should match the id of the field the label is intended for.
When a label is matched to a field, to select the field the user can either click directly on the field, or on the associated label.
The final new element you can see here, is the line break element (br). This is a self-closing element and it simply adds a line break. Using it at the end of the answer options ensures each of them appears on a new line.
OK, so I now have a way of selecting my answer, but how do I submit it? I made the following changes to the form section of my file:
      <form action="index.html" method="get">
      <input type="radio" id="option1" name="answer" value="1"> <label for="option1">Sydney</label><br>
      <input type="radio" id="option2" name="answer" value="2"> <label for="option2">Melbourne</label><br>
      <input type="radio" id="option3" name="answer" value="3"> <label for="option3">Canberra</label><br>
      <input type="radio" id="option4" name="answer" value="4"> <label for="option4">Brisbane</label><br>
      <input type="submit">
    </form>
You can see I’ve added a new type of input element to the bottom of my form. When the type attribute is set to submit, this creates a button that is used to submit the filled in form fields. But where are they submitted to?
That’s something I specify in the form element itself. You can see that it now has two attributes. The first of these, action, tells the browser where to send the form data to. In this case I’m sending it back to the current page, index.html.
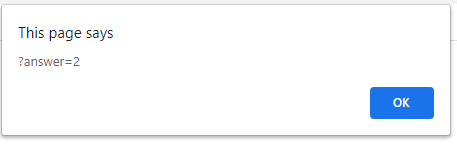
To demonstrate why, I’ll select one of the answer options, then click the Submit button. At first sight it appears that nothing happened other than my page reloaded. But when I take a look above the page at the address bar at the top of my browser I see:
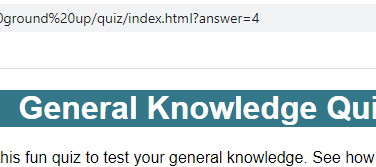
You can see the normal URL is now followed by “?answer=4” (and the number will be different depending on what answer I select). The reason I’m seeing this has to do with the second attribute in the form element, method. There are two possible values for this attribute:
- GET: The form data is appended to the URL. The start of the form data is indicated by a question mark (?) which is followed by a series of what are known as name-value pairs. This is a way of indicating a series of values by providing some form of identifier, in this case the name of a form field, paired with its value. The name and value of the form field are separated by an equals symbol (=). In this case there’s only one name-value pair but, if I had additional form fields, each would be separated by an ampersand (&), e.g. if I had a field called “rating” that allowed players to rate each question out of 5, the end of my URL might have looked like this: ?answer=4&rating=3. GET is commonly used when transmitting small amounts of data and when the security of that data is not critical (clearly you wouldn’t want your web passwords, for example, being openly displayed on the browser’s address bar or available via the browser’s history).
- POST: The form data is embedded in the HTTP request, which is basically the data the browser sends to a server when it requests a new resource, such as a web page. Unlike GET, this data is not visible to the casual observer, so it’s more appropriate when security is a concern, and it can handle more data than GET.
For my purposes though, GET is perfectly adequate. I’ll only be sending data for a few form fields and security is not an issue here.
So where do the two parts of the name-value pair come from? Well you’ve probably spotted that “answer” is the name I gave to my radio buttons. You can also see that I’ve added a new attribute to each button, value. This is the value that will be sent if that button is selected. By giving them values from 1 to 4, I can easily identify which button was selected.
OK, so how do I now get that value from the URL so I can let the player know if they were correct or not? For that I need to use a programming language of some kind. The most commonly used language for web pages is JavaScript, and that’s what I’ll use here.
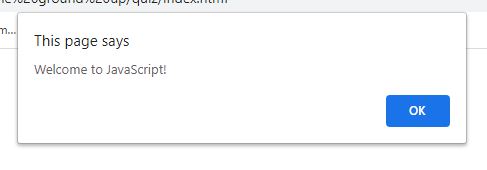
I can use JavaScript directly in my HTML files, but because it’s not HTML, I first have to tell the browser that I’m going to use it, so it knows not to treat it like HTML. The way I do that is to enclose it in a script element. I added the following, at the bottom of the body element of index.html, just above the closing </body> tag.
<script>
  alert('Welcome to JavaScript!');
</script>
When I refresh this page in a browser the first thing I see is:
Let’s take a look at what’s happening here. Everything inside the script element will be interpreted as JavaScript rather than HTML. At the moment, I have just one line of code:
alert('Welcome to JavaScript!');
This is an example of a JavasScript statement. Notice that statements in JavaScript end with a semicolon (;). A common mistake I made when learning JavaScript was to forget the semicolon. It’s one of the first things to check if I get errors.
JavaScript uses functions, which are self-contained bits of program that do a particular thing. To make use of a function in JavaScript, I enter the name of the function, e.g. alert, and then some arguments in parentheses, e.g. (‘Welcome to JavaScript!’). The arguments I use will depend on what the function does. This is known as calling a function.
JavaScript has a large number of built-in functions, of which alert is one*. As you saw when I reloaded the page, alert displays a pop-up box containing whatever message I entered as an argument. Note that the message must be inside quote marks (I’ve used single quote marks here, but I can also use double quote marks). This is known as a string, because it’s a string of characters.
*optional technical explanation: Strictly speaking alert is not part of the JavaScript language, it is actually a function belonging to something called the window object which is made available by the browser. I’m glossing over this for the time being because I haven’t introduced objects yet. For the moment, just accept that, when I am running JavaScript in a browser, alert is a function that is available to me.
You might be wondering where the other bit of text “This page says” comes from. This is something the browser adds as a security feature, so the user knows that the message was generated by the HTML page. The browser also adds the OK button, which the user must click to dismiss the pop-up box.
Let’s see how I might use this function to confirm the player’s answer. I changed the line of code that calls the alert function to the following:
alert(window.location.search);
Instead of a string containing a message, I’ve now used window.location.search. This let’s me access the part of the URL created by the GET method when I submit my form.
When I reload the page I see
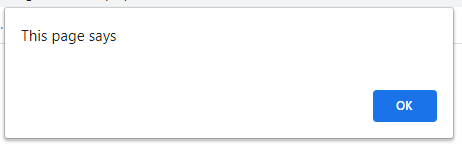
It’s blank because the question has not yet been answered. I click OK then select an answer and click Submit and I see:
OK, that’s great but what I’m really interested in is just the value of answer – I don’t need the question mark or the name of the field, or the equals symbol as well. I’ve replaced the single line of code inside the script element with the following two lines:
      let formValues = new URLSearchParams(window.location.search);
      alert('You selected option ' + formValues.get('answer'));
There’s quite a lot that’s new here, so let’s take it one step at a time. A JavaScript statement beginning with let is used to create something called a variable. When I create a variable, the browser sets aside some memory and gives it whatever name follows let. So in this case the variable will be called formValues. This is known as declaring a variable. As well as declaring a variable I can also initialise it with a value, by following the name with an equals symbol (=) and then the value. For example, if I wanted to store a player’s score and set it to zero, I might use:
let score = 0;
As their name suggests, the values in variables can vary. So later, if the player had scored some points, I could change the value in score with:
score = 10;
Notice that, once I’ve declared a variable, I don’t need to use let again to refer to it.
In the case of my code the value is being generated by new URLSearchParams(window.location.search). You should recognise that window.location.search is what I used earlier to get the end of the URL containing our form values. The rest of this is creating something called a JavaScript object. Don’t worry about how this works for the moment. It’s a topic I’ll be coming back to in future posts.
For now, just understand that formValues will now become a URLSearchParams object that I can use to get information about the choice made by the player. I do that on the next line with formValues.get(‘answer’). This will search for the name answer and return the value it finds paired with that name, which in this case is going to be a number from 1 to 4 indicating the player’s choice.
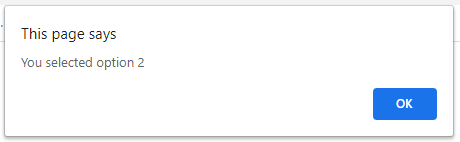
I’m doing something a little different with the string I give to alert on line 22. When I do this: ‘You selected option’ + formValues.get(‘answer’) it’s called string concatenation. I’m basically asking JavaScript to take the first string ‘You selected option ‘ and add another string to it to create a longer single string. In this case, what I’m adding to it is the value of the form field the player selected. If I refresh the browser, click OK to dismiss the blank alert, then answer the question and click Submit, I see this:
That’s a bit more useful than just showing the end of the URL. But what I really want to do is determine if the player answered the question correctly or not. To do that, I can use an important JavaScript statement if. The if statement is used to make decisions. Consider a parent telling their child, “If you have finished your chores, then you can go to the mall with your friends”. There are two possible outcomes to this statement:
- Chores are not finished: don’t go to the mall
- Chores are finished: do go to the mall
The outcome (going to the mall) depends on whether a condition is met (the chores are finished). This is exactly how the if statement works in JavaScript. I updated my code to the following:
      let formValues = new URLSearchParams(window.location.search);
      let result = 'incorrect!\nTry again or go to the next question';
      let answer = formValues.get('answer');

      if (answer == '3') {
        result = 'correct!\nGo to the next question';
      }

      if (answer != null) {
          alert('Your answer is ' + result);
      }
After initialising formValues in line 21, I’m initialising two more variables on lines 22 and 23.
On line 22, result is being set to a string. Something that will be new to you here is the strange character sequence \n. This is called an escape sequence. It’s needed because there are some special characters that are not permitted in strings, and one of these is the linebreak or newline character. So we use escape sequences to represent these special characters. An escape sequence always begins with a backslash (\) and is followed by a single character representing the type of special character I want. In this case I’ve used n to indicate a newline. You might be wondering, if I use backslash to start an escape sequence, what happens if I need to include a backslash in my string? The answer is that I escape the backslash, so I’d use \\. I’ll be using other escape sequences in future posts. For now, know that I’m using \n here because I want the text that follows to start on a new line.
In line 23, I am getting the value of the option chosen by the player and storing it in a variable, answer. I’m doing this because I need to use it in two different places, on line 25 and line 29.
Lines 25 to 27 contain the first of two decisions. Notice the structure of an if statement. The first bit in parentheses is the condition. This condition is checking to see if the value of the answer we selected is equal to ‘3’. There’s something important to note here. When I am assigning variables, I use a single =, e.g let score = 0;. When I am checking for equality, I use a double ==. I guarantee you that a common mistake all programmers will make when they are learning JavaScript is to accidentally use = when they intended ==. Along with missing semicolons, it’s another thing to check for if my script doesn’t work as I expect.
The condition is followed by some code enclosed in a pair of curly braces ({}). Notice that I’ve placed the opening curly brace at the end of the line containing if, and the closing curly brace on a line on its own. I can also place the opening curly brace on a line on its own if I wish, like this:
 if (answer == '3')
{
     result = 'correct!\nGo to the next question';
}
This is a matter of personal preference, but whichever I chose, it’s important to be consistent.
The code inside the curly braces will only be executed if the condition is met. In other words if answer is equal to ‘3’ the code in the curly braces will be run, and if answer is anything other than ‘3’ it won’t be run. So you can see here that if the player picks the third option, then result will be changed to indicate a correct answer.
On line 30 I have the alert function that you’re familiar with by now, but it’s enclosed in another if statement. I’m pretty tired now of having to dismiss the blank alert box that appears when I first load the page. By enclosing the call to the alert function in a second decision, I can make sure the alert box only appears when I want it to.
Here’s how it works. If formValues.get(‘answer’) doesn’t find a name-value pair with a name of ‘answer’, it returns a special value called null. This special value is often used in JavaScript to indicate the absence of a value. When the player first loads the page in a browser, they won’t yet have answered the question, so formValues.get(‘answer’) will return null. When the player answers the question and submits the form, then the page will reload and this time formValues.get(‘answer’) will find ‘answer’ and return a value. So by only showing the alert box if I have a value other than null, I can stop it bothering the player when the page is first loaded.
Notice that I’m using != here, which means not equal to. In fact there’s a whole range of relationships I can check for:
- a == b (a is equal to b)
- a != b (a is not equal to b)
- a < b (a is less than b)
- a <= b (a is less than or equal to b)
- a > b (a is greater than b)
- a >= b (a is greater than or equal to b)
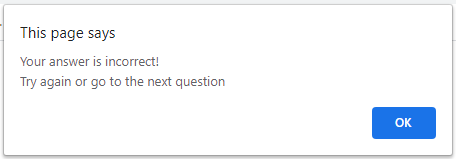
To try this out, I made sure I closed the page in my browser and saved my updated index.html file. Now I opened it in the browser again. The first thing I noticed is that I now see the question straight away (no unnecessary alert box). Now I selected a wrong answer (the first, second or fourth option) and then Submit. I saw this:
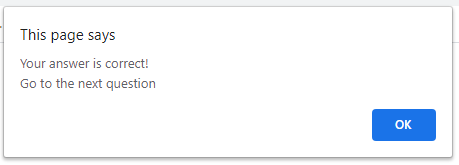
Now I clicked OK to dismiss the alert box and selected the correct answer (option 3, Canberra), and I see this:
Great! I finally have the start of an interactive quiz. In the next post, I’ll continue to make improvements and find out how I can extend this functionality to the other pages in my quiz. In the meantime, here’s a couple of challenges I’ll be thinking about.
After all that hard work I did to use a CSS style sheet to get my page to look pretty, I now have a very ugly looking Submit button. I’ll see if I can use my new CSS skills to fix this. I should be able to make it look nice using the CSS properties I know: margin, padding, color, background-color and font-family. One thing to watch out for – if I use input as my selector, my style is going to be applied to my radio buttons as well. You’ve already seen a way around this problem.
The other thing that’s very ugly is this alert box. Is this also something I can apply my own style to?
I’ll show you a solution in the next post.
Be First to Comment