You can see an index of all the posts in this series: go to index.
If you want to review my progress, here are the files from the end of the previous post: modifying html with javascript.
At the end of the previous post I left myself with the challenge of making the submit button disappear if the user had answered the question correctly. To do that, I first have to give my submit button a unique id, like this:
<input type="submit" id="submit">
Now I need to modify my JavaScript file to add this line underneath the other let statements at the top of the file:
let submitButton = document.querySelector('#submit');
This gets a reference to the submit button into the variable submitButton. Then I modify the code that deals with a correct response, like this:
    if (answer == correct) {
      submitButton.classList.add('hidden');
      correctFeedback.classList.remove('hidden');
      nextQuestion.classList.remove('hidden');
    } else {
Notice that the new line 30 is doing a similar thing to the lines that show my feedback, but instead of using remove, I use add. This causes the hidden class to be added to the submit button which sets its display to none, making it disappear:
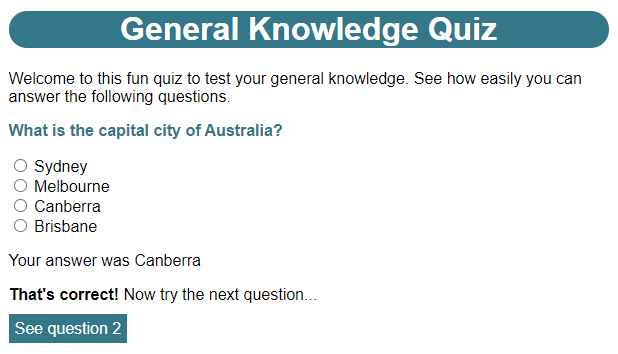
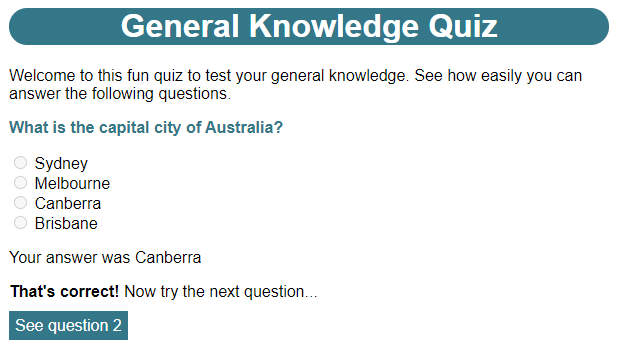
One small issue though, is that, even though the Submit button is gone, I can still click the radio buttons to activate them. Ideally these should be disabled once the question is answered correctly. I can do that using another loop:
    if (answer == correct) {
      for (let i = 1; i <= numOptions; i++) {
        document.querySelector('#option' + i).disabled = true;
      }
      submitButton.classList.add('hidden');
      correctFeedback.classList.remove('hidden');
      nextQuestion.classList.remove('hidden');
    } else {
You’ll recognise that this loop is very similar to the one I used to collect the user’s answers. A small difference here is that I’ve used i++ instead of i = i + 1. Both those expressions actually do the same thing. The ++ is called the increment operator. It’s useful because incrementing a value by 1 is something that programmers end up doing a lot of in their code. The increment operator has another trick up its sleeve though when it’s used as part of a longer expression. If I place the increment operator after the variable (i++), the value that is returned is what’s in the variable before the increment operation. If I use it before the variable (++i) then the value that is returned is what’s in the variable after the increment operation. Consider the following examples:
let a = 0;
let b = 0
let c = 5:
let d = 5;

c = c - ++a;
// a now contains 1 because of the ++ operation
// c now contains 4 because we incremented a before subtracting it from b

d = d - b++;
// b now contains 1 because of the ++ operation
// d still contains 5 because we subtracted the value of b before incrementing it (i.e. 0)
Note that when I use the increment operator outside of an expression, as I do in my for loop, it doesn’t make any difference which of the two forms I use.
Inside the loop I access each of the answer options in turn and set their disabled property to true. The disabled property will stop the element from functioning if it’s set to true. Now, when the user answers the question correctly, they will no longer be able to activate the options:
If I want to apply this functionality to questions 2 and 3 now, I’d need to edit their files to add the id attribute to the submit button. This illustrates a very big problem with my current quiz. Each time I make a change to the code, I have to apply it to multiple pages – not so bad with just 3 questions, but imagine if I had 20! Wouldn’t it be better if I had a single page to deliver questions and I could just add in the data that changed (i.e. the question type, the question text, the answer options and the marking data)?
For this next stage of development of my quiz, in which I’ll create a solution for this problem, I’ll need to use a web server. Up to now the browser has been accessing my files directly. Usually, when you visit a web page, the browser requests each resource it needs from the web server. It does this using something called the Hyper Text Transfer Protocol (or HTTP). I’m going to be using HTTP to get data for my next version of the quiz, but this won’t work if the browser is accessing the files locally.
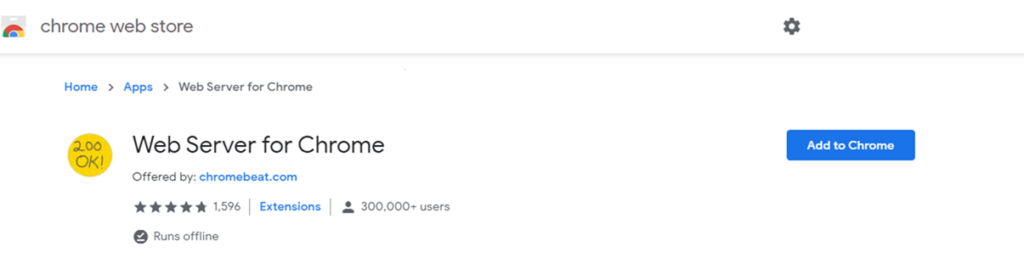
However, setting up a local web server is a bit of a pain, if I’m honest. So I’m going to opt for a simple alternative. I use Google Chrome and a Chrome extension called Web Server for Chrome. To get this, I opened Google Chrome and navigated to https://chrome.google.com/webstore/detail/web-server-for-chrome/ofhbbkphhbklhfoeikjpcbhemlocgigb?hl=enhttps://chrome.google.com/webstore/.
On this page, I clicked the Add to Chrome button.
And saw a pop-up with the following warning:
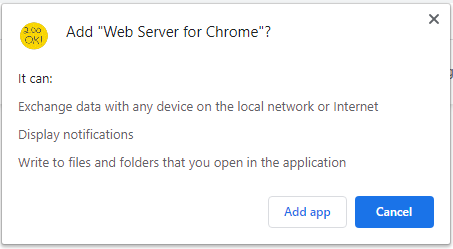
I selected Add app. I now saw the Chrome apps page, which included the following icon:

When I clicked this, I saw the following dialogue:
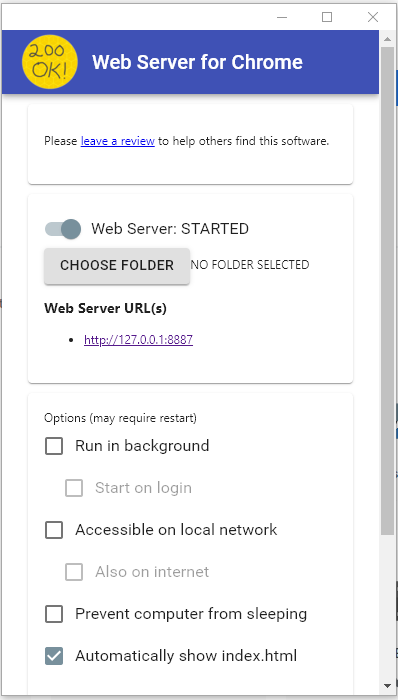
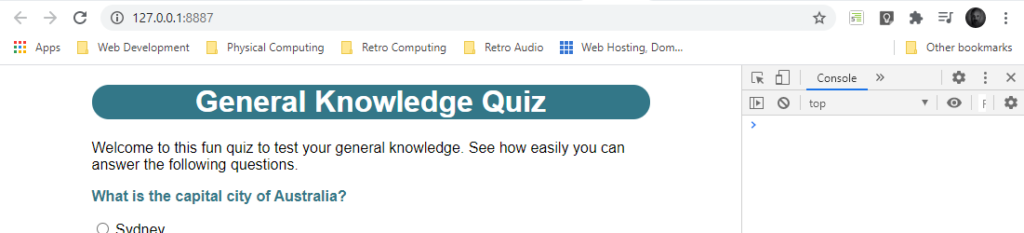
I made sure that Automatically show index.html was checked, then clicked the CHOOSE FOLDER button. I selected the quiz folder where my quiz html files are stored. Then I clicked the link under Web Server URL(s). I could now see the first question in my quiz. By keeping this page open while I continue development, I simply need to refresh the page whenever I make changes.
I’m going to introduce something called JSON. This stands for JavaScript Object Notation, and it’s become one of the most popular formats for passing information to and from web pages. I’m going to build my question data as a JSON file. First I created a new folder inside my quiz folder and called it data. Inside the data folder, I created a new empty file called quiz.json, then added this content to it:
[
  {
    "type": "single",
    "questionText": "What is the capital city of Australia?",
    "image": null,
    "options": [
      {
        "optionText": "Sydney",
        "correct": false
      },
      {
        "optionText": "Melbourne",
        "correct": false
      },
      {
        "optionText": "Canberra",
        "correct": true
      },
      {
        "optionText": "Brisbane",
        "correct": false
      }
    ]
  },
  {
    "type": "multi",
    "questionText": "Which of the following are national languages of Switzerland?",
    "image": null,
    "options": [
      {
        "optionText": "English",
        "correct": false
      },
      {
        "optionText": "French",
        "correct": true
      },
      {
        "optionText": "German",
        "correct": true
      },
      {
        "optionText": "Italian",
        "correct": true
      },
      {
        "optionText": "Romansh",
        "correct": true
      }
    ]
  },
  {
    "type": "single",
    "questionText": "What is the total area of the room shown in this plan?",
    "image": "html-question3-image.png",
    "options": [
      {
        "optionText": "10 m<sup>2</sup>",
        "correct": false
      },
      {
        "optionText": "12.5 m<sup>2</sup>",
        "correct": false
      },
      {
        "optionText": "50 m<sup>2</sup>",
        "correct": false
      },
      {
        "optionText": "56.25 m<sup>2</sup>",
        "correct": false
      },
      {
        "optionText": "62.5 m<sup>2</sup>",
        "correct": true
      },
      {
        "optionText": "75 m<sup>2</sup>",
        "correct": false
      }
    ]
  }
]
A JSON file consists of objects containing propeties. An object is enclosed in curly braces ({}). Inside an object I can have one or more properties. A property consists of a string that names the property, followed by a colon and then a value. So, for example, if I have a property like this:
"optionText": "German",
Then “optionText” is the name of the property and “German” is its value. The name of a property must always be in quotes. Notice also, that unlike JavaScript where I can use either double or single quotes, in JSON I must always use double quotes. Also notice that, where an object has more than one property, those properties are separated with commas.
JSON also understands a structure called an array. A major difference between an array and an object is that, each element in an object, i.e. its properties, is given a unique name, while the elements of an array are not named. Also, while an object is enclosed in curly braces, an array is enclosed in square brackets ([]). Like the properties in an object, the elements of an array (if there are more than one) are separated with commas.
Notice that an array can contain objects and/or other arrays and and an object can also contain other objects and/or arrays. A JSON file must always have a single root object or array. In this case, it’s an array containing three objects, each of which holds the data for one of my questions.
Within each of those objects I have four properties:
- type: This will be either “single” or “multi” for single answer or multiple answer question types respectively
- questionText: the question that is shown to the user
- image: this is set to the filename of the image, if one is used, or null if not
- options: this is an array of objects, each of which has the following two properties
- optionText: the answer text that is shown the the user
- correct: set to true if this answer is correct and false if incorrect
So how do I make use of all this information? As I mentioned earlier, my JavaScript will make something called an HTTP request to get the data in the JSON file. I changed the quiz.js file to look like this:
var quiz = {
  quizData: null,
  initialiseQuiz: function() {
    fetch('/data/quiz.json')
    .then(response => response.json())
    .then(json => {
      this.quizData = json;
      console.log(this.quizData);
    })
    .catch(error => {
      console.error('Error: ',  error);
    })
  },
  checkAnswer: function(questionType, correct, numOptions) {
    let formValues = new URLSearchParams(window.location.search);
    let correctFeedback = document.querySelector('#correct');
    let incorrectFeedback = document.querySelector('#incorrect');
    let nextQuestion = document.querySelector('#nextQuestion');
    let answerGiven = document.querySelector('#answerGiven');
    let submitButton = document.querySelector('#submit');

    if (!formValues.entries().next().done) {
      let answer = '';
      let answerString = '';
      if (questionType == 'multi') {
        for (let i = 1; i <= numOptions; i = i + 1) {
          if (formValues.has('answer' + i)) {
            let commaString = answer.length > 0 ? ', ' : '';
            answer += commaString + i;
            answerString += commaString + document.querySelector('#label' + i).innerHTML
          }
        }
      } else {
        answer = formValues.get('answer');
        answerString = document.querySelector('#label' + answer).innerHTML;
      }

      answerGiven.innerHTML = 'Your answer was ' + answerString;
      answerGiven.classList.remove('hidden');

      if (answer == correct) {
        for (let i = 1; i <= numOptions; i++) {
          document.querySelector('#option' + i).disabled = true;
        }
        submitButton.classList.add('hidden');
        correctFeedback.classList.remove('hidden');
        nextQuestion.classList.remove('hidden');
      } else {
        incorrectFeedback.classList.remove('hidden');
      }
    }
  }
}
The first thing to note here is that I’ve enclosed everything in this file in an object which I’m assigning to a variable called quiz. The var keyword is one I’ve not used before. Previously, when I’ve been using let, I’ve been creating variables that are only valid for the function or block they are defined in. For example,
let formValues = new URLSearchParams(window.location.search);
creates a variable called formValues that is only accessible inside the checkAnswer function. If I tried to use it outside that function, I’d get an error. By contrast, when I use var quiz, I am creating something called a global object that can be accessed by the JavaScript in other parts of my project. The other thing to notice is that when I include functions as part of the object, e.g.:
checkAnswer: function(questionType, correct, numOptions) {
   .
   .
   .
}
I don’t include the function name between the keyword function and the parentheses as I did before. This is because I will use the property name as a way of referencing that function.
Why have I done this? Before, when I created a function like this:
function checkAnswer(questionType, correct, numOptions) {
  .
  .
  .
}
I was creating a global object. That means any part of my project can access it with. e.g.:
checkAnswer("single", "3", 5);
That’s fine while my projects are relatively small and self contained. But as I develop larger projects and start including external JavaScript libraries, I’ll want to limit the number of functions and variables that are global. There are two reasons for this:
- Having a lot of functions and variables that can be accessed globally increases the possibility of errors because I have less control over where those functions and variables are accessed
- I run the risk of something called a naming collision. This is where two items (functions or variables) have the same name, which will cause an error because the browser can’t work out which item I intended to reference
The way I can avoid this situation is by using something called a namespace. The checkAnswer function previously occupied the global namespace. By placing it inside an object called quiz, I am creating a new, more limited namespace. I can now no longer use the function call above to access checkAnswer. Instead I have to use dot notation to access it as part of the quiz object, like this:
quiz.checkAnswer("single", "3", 5);
You can see now, that if there happened to be another item called checkAnswer, even if that item was in the global namespace, the browser now sees them as distinct things.
Note that when I’m referring to the properties of an object from a function within that object, I use this, rather than the object name (for example, on line 8). The value of this depends on the context at the time it is used. In this case, it refers to the object that owns the function.
I’ll make a change to my index.html file to call the intialiseQuiz function using this dot notation. I changed the script element as follows:
<script>
  document.addEventListener("DOMContentLoaded", function() {
    quiz.initialiseQuiz();
  });
</script>
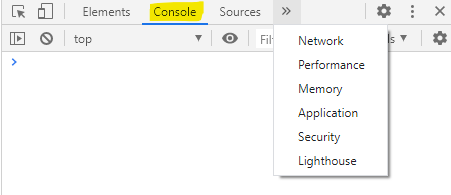
Having made those changes, I went back to Chrome and hit F12. This opens the Chrome’s developer tools in a panel to one side of my page:
I made sure that I was looking at the Console tab. I sometimes need to click the double chevron to see all the tabs:
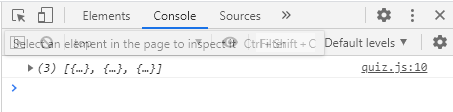
When I refreshed the page, this is what I see in the console, when everything is working as it should:
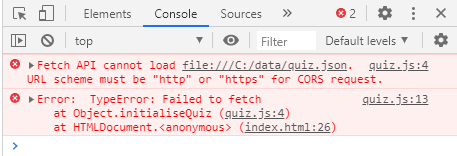
By the way, to reinforce why I’m now using a web server. If I try to access the file directly from my file system, I see this instead:
Even when I am using the web server, I will occasionally see something like this:
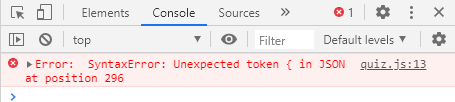
This happens when there is an error in my JSON file. Even something as small as a missing comma or a missing closing brace or square bracket can cause this.
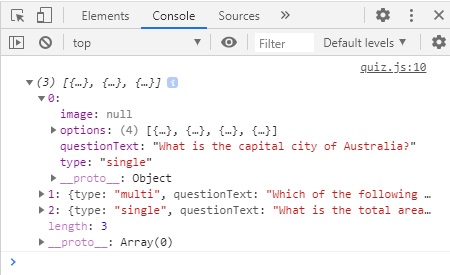
So, back to the expected output. What I’m looking at is actually the contents of the JSON file. When I click the arrowhead to open up the next level this becomes clearer. I’m now looking at the contents of the top level array, which contains the data for each of my three questions:

If I click the arrowhead next to 0 I can more easily see what’s in the data for the first question:
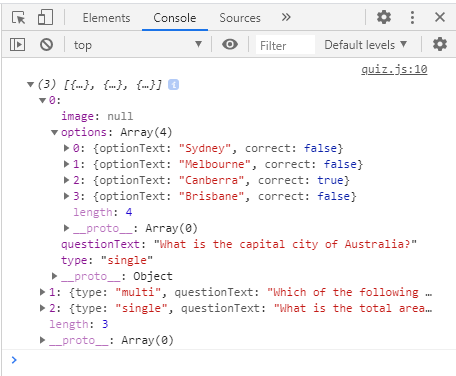
Finally, if I click the arrowhead next to options I can see the data for each of the answer options for that question:
So let’s go back to my initialiseQuiz function to see where all this data is coming from.
  quizData: null,
  initialiseQuiz: function() {
    fetch('/data/quiz.json')
    .then(response => response.json())
    .then(json => {
      this.quizData = json;
      console.log(this.quizData);
    })
    .catch(error => {
      console.error('Error: ',  error);
    })
  },
Firstly, notice that, just above the function, I’m creating a property of the quiz object, called quizData, which is initially set to null. I’m going to store the data I read in this property.
To read the data from the JSON file, I use a new function called fetch. This function creates something called an asynchronous HTTP request. I need to provide the resource I want to request as an argument to fetch, which in my case is ‘/data/quiz.json’. One thing to note about this is that fetch wants an absolute rather than a relative URL, which is why I’ve put a / at the start of the path. This tells fetch that, starting from the root folder of the web server, it needs to go into the data folder and find the file called quiz.json.
On line 7 I am putting the returned JSON data into the quizData property of my quiz object, then on line 8 I am writing that data to the console. Note that I use the console.log function to do this. This function is very useful for helping me to understand what’s going on in my scripts and I’ll be using it a lot of it throughout the rest of this series.
This fetch function is actually the first in a long chain of functions that are linked with dot notation. You’ve seen dot notation used many times now – the only difference here is that I am splitting the statement up over several lines to make it more readable, but I could actually rewrite it as:
fetch('/data/quiz.json').then(response => response.json()).then(json => {this.quizData = json;console.log(this.quizData);}).catch(error => {console.error('Error: ', error);});
While that’s perfectly valid JavaScript, you can see why it’s better to split it up over several lines. While it is structured similarly to other statements using dot notation, this statement does work a little differently. Let’s take a statement like this for example:
answerString = document.querySelector('#label' + answer).innerHTML;
This:
- gets the document object
- immediately runs the querySelector function in the document object
- immediately gets the innerHTML property of the element returned by that function.
This is a synchronous sequence of operations. No other part of my program can run while that sequence is taking place. But this is fine because each of those steps happens very quickly.
That’s not the case with fetch. The fetch operation might complete very quickly, or it might take a long time (for example, if the network is slow). Because the time taken to complete the fetch operation is indeterminate, it makes more sense to start the operation, go away and do other things and then come back and process the result of the fetch only once it has completed. This is an asynchronous operation, which is why we say that fetch makes an asynchronous HTTP request.
To make this work, rather than return a normal value, fetch returns something called a promise. It’s a promise because fetch is saying “Hey, I’m not going to have a response for you straight away, but I promise I’ll get back to you when I do.”
This means that, until that result is returned, my code can get on and do anything else it needs to do. I can show this working. I’ll the following code to the end of the initialiseQuiz function:
console.log("I'm the last thing to be displayed in this function!");
So I have a console.log function on line 8, which displays the quiz data and then a console.log function on line 14 which displays “I’m the last thing to be displayed in this function!”. You might reasonably expect that what I will see in the console is the quiz data followed by “I’m the last thing to be displayed in this function!”, but what I will see is this:
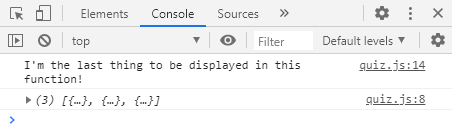
What happened here is that, the fetch operation was started on line 4, but then, while fetch was waiting for a response from the server, the browser continued to execute the remainder of the function, which was my line to display “I’m the last thing to be displayed in this function!”. That’s why this was displayed first. At some point after that, fetch received a response and we eventually got to the line that displayed the data. So, even though that line came first in the function, its output was displayed last. I’ll go ahead and remove that line of test code now.
So what happens when fetch eventually does receive a response from the server? I’ll want to do something with that response, so to do that I use the then function. This function can only be used with a function that returns a promise. The then function will execute as soon as the promise is completed. Inside then I use something called an arrow function. An arrow function is a lightweight form of a normal function and it looks like this:
(parameters) => expression
or like this:
(parameters) => { statements }
So while:
response => response.json()
might look a bit weird, it’s syntactically equivalent to an anonymous function like this:
function (response) {
  return response.json();
}
Similary, this:
json => {
      this.quizData = json;
      console.log(this.quizData);
}
is syntactically equivalent to this anonymous function:
function (json) {
    this.quizData = json;
    console.log(this.quizData);
}
The then function also returns a promise. This allows me to create a chain of promises, each of which is triggered when the previous promise returns a result. So in this case:
- The fetch function makes an HTTP request on line 4.
- When the response is received, the promise is passed through to the then function on line 5. This takes the response and runs the json function which parses the data in the JSON file (parsing means it analyses the text in the file and uses it to build an equivalent data structure in JavaScript).
- When this is complete, it passes the promise to the next then function on lines 6 to 9. This function transfers the parsed data to my quizData property and then displays that in the console.
Something else I need to take account of in my chain of promises is that, somewhere along the line, something could go wrong. I handle this using the catch function. This will be run if an error occurs anywhere in the chain that isn’t handled at an earlier point in the chain. In this case my function simply displays the error on the console, with the console. error function.
OK, so now I’ve managed to read my data in, how do I use it? First, I made the following changes to index.html:
<!DOCTYPE html>
<html lang="en" dir="ltr">
  <head>
    <meta charset="utf-8">
    <title>General Knowledge Quiz</title>
    <link rel="stylesheet" href="css/quiz.css">
    <script src="js/quiz.js"></script>
  </head>
  <body>
    <h1>General Knowledge Quiz</h1>
    <p class="hidden" id="firstQuestion">Welcome to this fun quiz to test your general knowledge. See how easily you can answer the following questions.</p>
    <p class="question" id="questionText"></p>
    <img class="hidden" id="image">
    <p>Select the correct answer<span id="multiple" class="hidden">s</span> and then click the Submit button.</p>
    <div id="options">
    </div>
    <button class="button" id="submit">Submit</button>
    <p class="hidden" id="correct"><strong>That's correct!</strong> <span id="nextQuestionPrompt" class="hidden">Now try the next question...</span></p>
    <p class="hidden" id="incorrect"><strong>Sorry! That's not the right answer!</strong> Try again...</p>
    <button class="button, hidden" id="nextQuestion">See question <span id="nextQuestionNum"></span></button>
    <div class="hidden" id="finalQuestion">
      <p>Thanks for playing the quiz!</p>
      <button class="button" id="replay">Play again</button>
    </div>
    <script>
      document.addEventListener("DOMContentLoaded", function() {
        quiz.initialiseQuiz();
      });
    </script>
  </body>
</html>
You’ll see I’ve introduced a couple of new elements here:
- button: This represents a clickable element on my page
- div: This is a generic block-level element I can use to structure my document or demarcate a section I want to identify, so that, for example, I can style it differently or use JavaScript to manipulate it
- span: The same as div except that it’s a generic inline element.
You’ll also see I’ve removed the form entirely – more on that later. I also made the following changes to my CSS file (changes highlighted, also notice the rules for a and a:hover have been removed).
body {
  font-family: Arial, sans-serif;
  max-width: 600px;
  margin: 0 auto;
}

button {
  padding: 6px;
  border: none;
  font-size: large;
  margin: 10px 0;
}

h1 {
  text-align: center;
  background-color: #337788;
  color: white;
  border-radius: 20px;
}

.button {
  background-color: #337788;
  color: white;
}

.button:hover {
  background-color: #4499aa;
}

.button:disabled {
  background-color: grey;
}

.hidden {
  display: none;
}

.optionButton {
  display: block;
  background-color: white;
  color: #337788;
}

.optionButton:enabled:hover {
  background-color: #44aabb;
  color: white;
}

.question {
  color: #337788;
  font-weight: bold;
}

.selected {
  background-color: #338877;
  color: white;
}
You’ll notice that, now my CSS file is getting larger, I’ve placed all the element selectors together, followed by all the class selectors, and I’ve organised these sections alphabetically. This will make it easier to find individual rules as my CSS files grow in size.
When I refreshed the page, I got this:

Don’t worry – I haven’t inadvertently trashed my page. What I’ve got here is a framework – an empty shell if you like, that I will now populate with data from my JSON file.
I made the following changes to the top of the quiz object in my quiz.js file (I’m leaving the checkAnswer function unchanged for now):
  quizData: null,
  currentQuestion: 0,
  page: null,
  initialiseQuiz: function() {
    this.page = this.getPageElements();
    fetch('/data/quiz.json')
    .then(response => response.json())
    .then(json => {
      this.quizData = json;
      this.updatePage();
    })
    .catch(error => {
      console.error('Error: ',  error);
    });
  },
  updatePage: function() {
    let questionData = this.quizData[this.currentQuestion];

    // Make introduction text visible if this is the first question
    this.setVisibility(this.page.firstQuestion, this.currentQuestion == 0);

    // Set the question text
    this.page.questionText.innerHTML = questionData.questionText;

    // Set the image
    let imageURL = questionData.image;

    if (imageURL != null) {
      this.page.image.setAttribute('src', "images/" + imageURL);
    }
    this.setVisibility(this.page.image, imageURL != null);

    // Set the instruction text
    this.setVisibility(this.page.multiple, questionData.type == 'multi');

    // Set the options
    let options = this.quizData[this.currentQuestion].options;

    for (let i = 0; i < options.length; i++) {
      let newOption = document.createElement('button');
      newOption.innerHTML = options[i].optionText;
      newOption.setAttribute('class', 'optionButton');
      this.page.options.appendChild(newOption);
    }
  },
Then, just after the checkAnswer function, I added the following two functions (one thing I have to remember, when adding new properties to an object, is to add a comma after the closing brace of the previous object, in this case the checkAnswer function):
  getPageElements: function() {
    let elementsWithID = document.querySelectorAll('*[id]');
    let pageEls = {};

    for (let i = 0; i < elementsWithID.length; i++) {
      pageEls[elementsWithID[i].id] = elementsWithID[i];
    }

    return pageEls;
  },
  setVisibility: function(element, condition) {
    if (condition) {
      element.classList.remove('hidden');
    } else {
      element.classList.add('hidden');
    }
  }
When I refreshed the page again, I saw this:
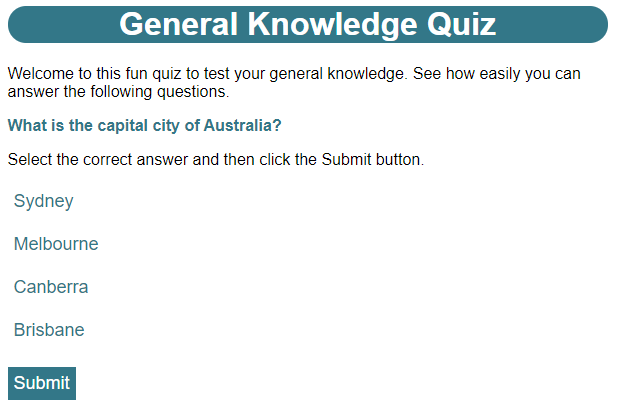
You can see that the page has now been populated with the data for the first question. Let’s see what’s happening in my script to achieve this.
Firstly, note that I’ve introduced a new property of quiz called currentQuestion. This starts at 0, because my questions are held in an array and the elements of an array in JavaScript are numbered starting from 0. So my three questions will be 0, 1 and 2 respectively.
I’ve added another property on line 4 called page. This will hold all the elements on the page with an id attribute. Why do I need this? Look at the first few lines of checkAnswer. I’m having to obtain references to all the elements of the page I need to work with. Now that I’m adding further functions, I’ll need to do the same for each of those functions, which is not very efficient. Instead it would be better to get the references I need once, and share that data between functions.
I do this with the getPageElements function on lines 86 – 95. Notice that I’m using querySelectorAll instead of querySelector on line 87. While querySelector will return just the first matching element, querySelectorAll will return an array will all matching elements. Something else that will be new to you here is the CSS selector I’m using. A * is a wildcard in CSS – this will match all elements. However, I only want elements with an id attribute, which I indicate with [id]. On lines 90-92 I loop through the elements found and I add them to an object, pageEls, using the element’s id as the property name. I then return this pageEls document.
Back on line 6, I’m assigning this to the page property.
Next, the final thing that happens in my promise chain on line 11, is that I call the new updatePage function. Remember this function won’t be called until the JSON file has been retrieved and all the information in it parsed and put into the quizData property.
At the start of the updatePage function, I get the data for the current question into the variable questionData (line 18). Note how I access an array element by enclosing the number of the element I want in square brackets. This is called the array index or subscript. From this point on, I can just refer to questionData to access data for the current question.
One thing that I’ll be doing a lot of is either showing or hiding items on the page depending on whether they’re needed and when they’re needed. Because I’m doing it a lot, it makes sense to have a function to handle it. You can see this defined as setVisibility in lines 96 to 102. It takes two arguments, the element to be made visible or hidden and a then a value of true or false, with true meaning make visible and false meaning make hidden. You can see it achieves this simply by either removing or adding the hidden class.
An example of this function in use is on line 21. I want the welcome message to appear if this is the first question only, so I call the setVisibility function with the paragraph element holding that text, and the condition this.currentQuestion == 0. This will evaluate to true only if I am on the first question. Note how I am getting a reference to the element here. I’m no longer using document.querySelector. Instead I’m looking the element up in the page property by using its id.
Line 24 sets the question text using its innerHTML property, which you saw in the previous part of this series. Note how I use dot notation to access the individual properties in both the page property and questionData variable – both of which hold objects.
On line 32 I also set the visibility of the image element based on whether this question has one or not. Before that though, if the question does have an image, I need to make sure the correct image is loaded. If you look at line 13 of my modified html file, you can see that, although the img tag is in there, it no longer has a src attribute. I’ll create a new src attribute for each image, as required.
This happens on lines 29-31. The function setAttribute will create a new attribute for the element of the specified type (or replace the existing one, if it already exists) and sets its value. I get the value by concatenating the path to the images folder with the name of the image file taken from the question data. Doing it this way means, if I decide to change the location of my images, I only need to update this one line of code rather than every single instance of an image property in my JSON file.
Line 35 has the effect of adding an ‘s’ to ‘answer’ in the instruction text so that it correctly refers to answers in the plural when the question is a multiple answer type.
On lines 40 – 45 I loop through all the options in the question data, and, for each one, I create a new button element to show that option. Note that I use options.length in the loop condition on line 38. The length property of an array contains the number of elements in the array.
I create each button with the document.createElement function. Note that once I’ve created the button element, I set its innerHTML to the correct option text and then add a class attribute of “optionButton”, so it is styled correctly. The complete element won’t appear on the page until I explicitly add it. I do this by appending each one as a child element of the empty div on lines 15 and 16 of index.html.
To see the power of this way of building my quiz page, I can go into quiz.js and change the initial value of currentQuestion to 1 (remember this is the second element of the array and therefore the second question). When I refresh the page, I see this:
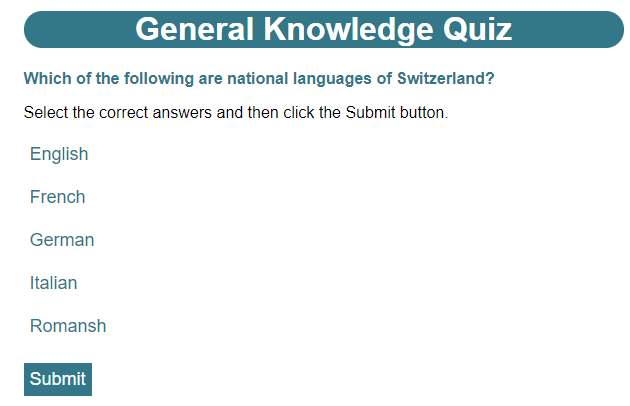
Note that the welcome text is not shown for this question and the instruction now refers to “answers” instead of “answer”. Now, if I change currentQuestion to 2 (the third question), then refresh the page again, I see this:
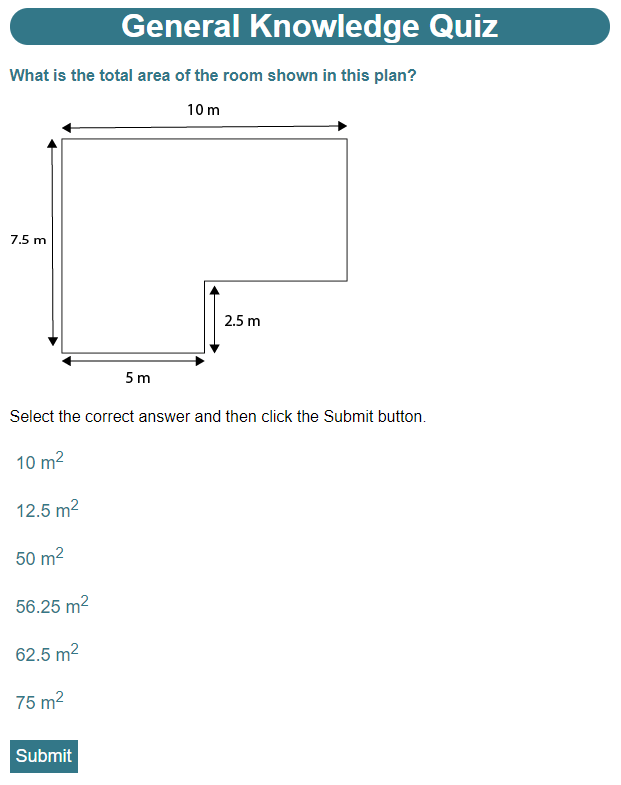
I have to remember to change currentQuestion back to 0 when I’ve finished experimenting. Now that I have a single page that can show any question, I can delete question2.html and question3.html – I won’t be needing them again.
One negative impact of making all these changes, is that my questions are no longer fully functional – I can’t select answers or submit them. I’ll fix that in the next post in this series when I further explore JavaScript events.
In the meantime, here’s another challenge I’ll need to solve. At the moment, there’s no way for the user to tell how far through the quiz they are. I need to add a paragraph that appears above the question text and tells the user which question they are viewing, e.g. “Question 1 of 3”. I’ll show my solution in the next post.
Be First to Comment