You can see an index of all the posts in this series: go to index.
If you want to review my progress, here are the files from the end of the previous post: data with json
At the end of the previous post, I left myself with the challenge of adding question numbering, so the user sees something like “Question 1 of 3” above each question. To implement this, the first thing I have to do is add a line to index.html (I’m adding this just above the paragraph element holding my question text):
<p><strong>Question <span id="questionNum"></span> of <span id="totalQuestions"></span></strong></p>
Note that I’ve used two empty span elements here, one for the question number and one for the total number of questions. It’s tempting to just write the last number directly, but this would mean I’d have to update this line every time I add or remove a question.
Next I expanded the updatePage function in quiz.js to add in the dynamic information to this line (I added these changes just before the code that sets the question text):
    // Set the question numbering
    this.page.questionNum.innerHTML = this.currentQuestion + 1;
    this.page.totalQuestions.innerHTML = this.quizData.length;
There are two things to note here. Firstly, I’m adding 1 to currentQuestion to get the question number. Remember that arrays are indexed starting from zero, so I need to add 1 to get the accurate number. Secondly, note how I’m using the length property again to get the length of the array holding the questions. This means I can now add or remove questions and this number will always be correct.
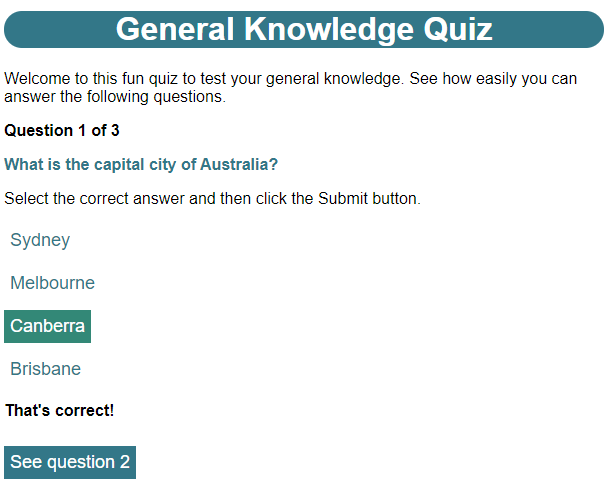
When the page is opened in the browser, I see this:
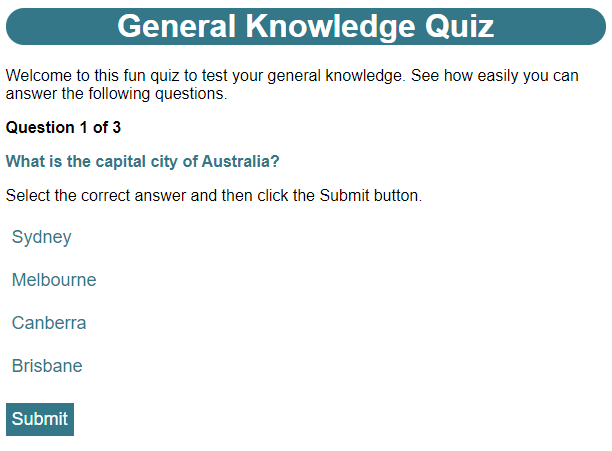
That’s a better experience for users as they can now easily see both how long the quiz is and how far through it they are.
Now I have to fix a big problem – the changes I made in the last post have broken my quiz’s functionality. I’ll fix this one bit at a time. First up is that I need the user to be able to select and deselect options. I can do this using event listeners. You’ll recall that I am currently using an event listener to listen for the event “DOMContentLoaded” so I know when it’s safe to start running my initialisation code. I’ll use the same technique here, except this time I’ll be listening for a button press. I made the following changes to the code that sets the options in the updatePage function:
     // Set the options
    let options = this.quizData[this.currentQuestion].options;

    for (let i = 0; i < options.length; i++) {
      let newOption = document.createElement('button');
      newOption.innerHTML = options[i].optionText;
      newOption.setAttribute('class', 'optionButton');
      newOption.setAttribute('id', 'option' + i);
      this.page.options.appendChild(newOption);
      document.querySelector('#option' + i).addEventListener('click', this.optionClicked);
    }
Then I added this function just below the bottom of the checkAnswer function and above the getPageElements function:
  optionClicked: function(evt) {
    console.log("You clicked: " + evt.target.id);
  },
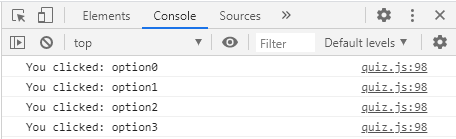
On line 48 I’ve now added an id attribute to each of the answer options. On line 50 I add an event listener, which is the new function I added on lines 92-94. Note that the event I am listening for is click, which is triggered every time the user clicks the button. I’m using document.querySelector to find these elements because I’ve only just created them and they won’t be included in my page property.
The browser automatically passes an Event object as an argument to whichever function I set as the event listener. This object contains a lot of useful information about the event. One of the properties of the Event object is a reference to the element that received the event. This is called target, and you can see I use it on line 93 to get the id of the button that was clicked. I reloaded the page in the browser, opened the console in developer tools and clicked each of the option buttons from top to bottom. This is what I saw:
So now that I can respond to an option being clicked, and I can identify which option it was, I can use this information to make appropriate changes to the page. I updated the optionClicked function as shown below:
  optionClicked: function(evt) {
    // If option is currently selected, deselect it
    if (evt.target.classList.contains('selected')) {
      evt.target.classList.remove('selected');
    } else {
      // We're selecting the option
      // If questionType is 'single', cycle through all options and deselect them
      if (quiz.quizData[quiz.currentQuestion].type == 'single') {
        let options = document.querySelectorAll('.optionButton')
        for (let i = 0; i < options.length; i++) {
          options[i].classList.remove('selected');
        }
      }

      // Now select the option
      evt.target.classList.add('selected');
    }
  }
When an option is selected, I apply the selected class to it. This serves two purposes:
- It allows me to set a visual style for selected items (I already defined a rule for this class in my CSS)
- It allows me to tell which option(s) is/are selected simply by checking for the presence of this class.
The first thing I do is check to see if the clicked button was already selected (line 94). I’m using a new function with classList here, contains. This returns true if the specified class was found and false if it wasn’t. If the option is currently selected, then all I need to do is deselect it (line 95).
If the option is not currently selected, then things get a little more complicated because the behaviour needs to be different depending on the question type. For a multiple answer type question I can simply select that option. For a single answer type, only one option can be selected at a time. I handle this by first looping through all the options and deselecting them, before I select the option that was clicked. Notice that I’m again using querySelectorAll instead of querySelector on line 100 to return an array with all matching elements.
Something you might have noticed here is that I’m using, for example, quiz.quizData to refer to a property of the quiz object, rather than this.quizData. You’ll recall that earlier I told you the value of this was dependent on context. Inside an event listener, the browser will set this to be the object that the event originated from, so I can’t use it here to refer to the quiz object.
Refreshing the page in the browser I find that, on questions 1 and 3 I can select or deselect an option, but if I try to select an option while another is currently selected, that previously selected item will be deselected.
When I change currentQuestion to 1 (for question 2), I find that I can select and deselect elements freely.
There’s one more thing I should do with my option selection code. At the moment, the Submit button can be used, even if the user has not selected an option. I should prevent the user from using the Submit button until they have at least one option selected.
I added a couple of lines at the very end of the updatePage function:
    // Set up submit button
    this.setSubmitState();
And at the end of the optionClicked function:
quiz.setSubmitState();
Finally, I added a new function, beneath the optionClicked function:
  setSubmitState: function() {
    document.querySelector('#submit').disabled = document.querySelectorAll('.selected').length == 0;
  }
An element’s disabled state determines whether the user can interact with that element or not. If it’s set to true, the element will not respond to attempts to interact with it. Note that I’m setting this simply by checking whether there are any elements with a selected state (indicated by the presence of the selected class).
I set this state initially when the page is first created (line 54), then I need to check it again each time the user clicks an option (line 112).
So that a disabled button has a different look, I already added this rule to my CSS:
.button:disabled {
  background-color: grey;
}
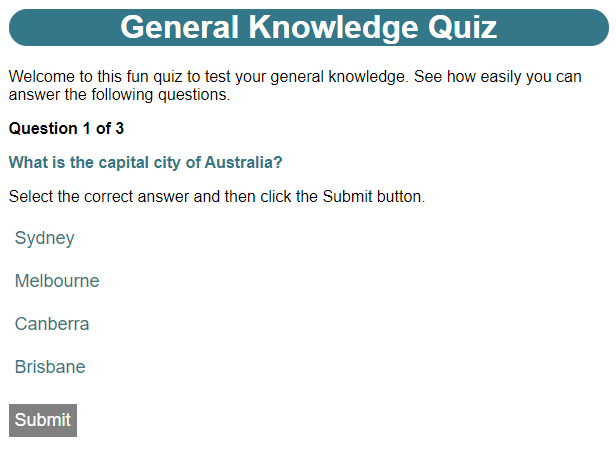
When I reload the page, I see that the button has a grey disabled state until I select an option:
I’m now ready to take care of the next bit of functionality – enabling the user to submit an answer. You’ve probably already guessed that this involves setting up another event listener. I made the following change to the fetch function call:
    fetch('/data/quiz.json')
    .then(response => response.json())
    .then(json => {
      this.quizData = json;
      this.page.submit.addEventListener('click', this.checkAnswer);
      this.updatePage();
    })
You might be wondering why I’m setting this event handler here rather than in updatePage. This is because the submit button is a persistent element and its event handler will never change – unlike the option buttons which change each time I update the page. If I try and register the same event handler multiple times, it won’t break my code, but it is inefficient, so it makes sense to do it just once when the page is first loaded.
Now I need to make some changes to my checkAnswer function, because it’s currently set up to handle the old version of the page that used an HTML form:
  checkAnswer: function() {
    // Hide incorrect feedback in case it is still showing from a previous attempt
    quiz.setVisibility(quiz.page.incorrect, false);

    // Check users selections to see if they have selected the correct options
    let options = quiz.quizData[quiz.currentQuestion].options;
    let answeredCorrectly = true;

    for (let i = 0; i < options.length; i++) {
      let isSelected = document.querySelector('#option' + i).classList.contains('selected');
      if ((options[i].correct && !isSelected) || (!options[i].correct && isSelected)) {
        answeredCorrectly = false;
        break;
      }
    }

    if (answeredCorrectly) {
      let optButtons = document.querySelectorAll('.optionButton');
      for (let i = 0; i < options.length; i++) {
        optButtons[i].disabled = true;
      }

      quiz.setVisibility(quiz.page.submit, false);
      quiz.setVisibility(quiz.page.correct, true);
      let atFinalQuestion = quiz.currentQuestion == quiz.quizData.length - 1;
      quiz.setVisibility(quiz.page.finalQuestion, atFinalQuestion);
      quiz.page.nextQuestionNum.innerHTML = quiz.currentQuestion + 2;
      quiz.setVisibility(quiz.page.nextQuestion, !atFinalQuestion);
    } else {
        quiz.setVisibility(quiz.page.incorrect, true);
    }
  },
On line 62 I get a reference to the option data for the current question. On line 63 I start with the assumption that the user has answered the question correctly. On lines 65 to 71 I then loop through each of the options and check whether the option has not been selected when it should have been, or has been selected when it should not have been.
Because I’m checking for two things in my if statement, I’ve introduced a new operator here. The logical OR operator (||) will return true if either or both of the expressions either side of it evaluate as true. I’ve already used another logical operator, NOT (!) which returns true if the expression that follows it is false and vice versa. There’s a third logical operator, AND (&&) that will only return true if the expressions on either side of it are both true. I can show the outcomes of these operators using something called a truth table. Here are the truth tables for all three of these operators.
!a (NOT a)
a | output |
false | true |
true | false |
a || b (a OR b)
a | b | output |
false | false | false |
false | true | true |
true | false | true |
true | true | true |
a && b (a AND b)
a | b | output |
false | false | false |
false | true | false |
true | false | false |
true | true | true |
Notice that I’ve put parentheses around the expression on either side of the II operator. This ensures that the expressions on each side are evaluated first before the OR is applied. If either of these expressions is true, then the user has answered incorrectly, so I indicate this on line 68.
Line 69 has a statement that I’ve not used before: break. The behaviour of break depends on the context in which it is used. When it is used inside a loop, like this, it immediately ends execution of the loop and jumps to the first line of code following the loop. So in this case, if the user answers incorrectly, the loop will end and execution will continue with the if statement on line 73. Note that break will only break out of one loop. If I have a loop inside another loop (known as a nested loop) and I have a break statement inside the inner loop, then it will only break out of the inner loop, nor the outer one. (NOTE: there is actually a way to do this using labels, but it’s not recommended. If you are interested, you can read more about it in this article from MDN web docs). The reason I want to break out of the loop at this point, is that, as soon as I have found an incorrect response, there’s no point in checking the rest of the options.
On line 73 I check if the user has answered correctly. If they have, the first thing I want to do is disable the answer options – it would be a bit confusing for the user if they could still click on these and activate them at this point. I do this with the loop on line 75-77.
Next I hide the submit button on line 79, and show the correct feedback on line 80.
On line 81 I check to see if I’m currently at the final question. Notice that I’m doing this by comparing the question number to the length of quizData – 1. Remember this is because the array index starts at 0, so, for our three question quiz, the final question will be 2 not 3. I use this to show or hide the final question message and button on line 82 and the next question button on line 84. For the latter, I first have to set the number in the button to be the number of the next question (again this is +2 rather than +1 to account for the zero-based numbering of the array).
If the question was answered incorrectly, then all I have to do is show the incorrect feedback on line 103. Because the user is allowed to submit a different answer after an incorrect attempt, when I enter checkAnswer, I take the precaution of hiding the incorrect feedback on line 77. If I didn’t do this, then if the user first answered a question incorrectly, then answered it correctly, for their correct answer they’d end up seeing both the correct and incorrect feedback.
When I refresh the page now and answer incorrectly, I see this:
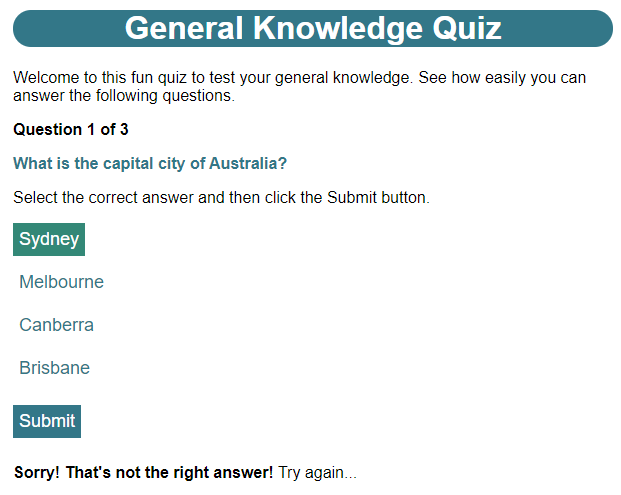
Note that, unlike my previous version, I can still see what I selected, so there is no need for me to restate the user’s answer. Because I answered incorrectly, I can now change my answer to the correct option and submit again:
Notice that the Submit button is no longer visible and if I try to activate any of the answer options I see that they don’t respond. I also have the button to take me to question 2. When I change currentQuestion to 2 and refresh the page in the browser to see question 3, then select the correct answer (62.5 m2), I see this:
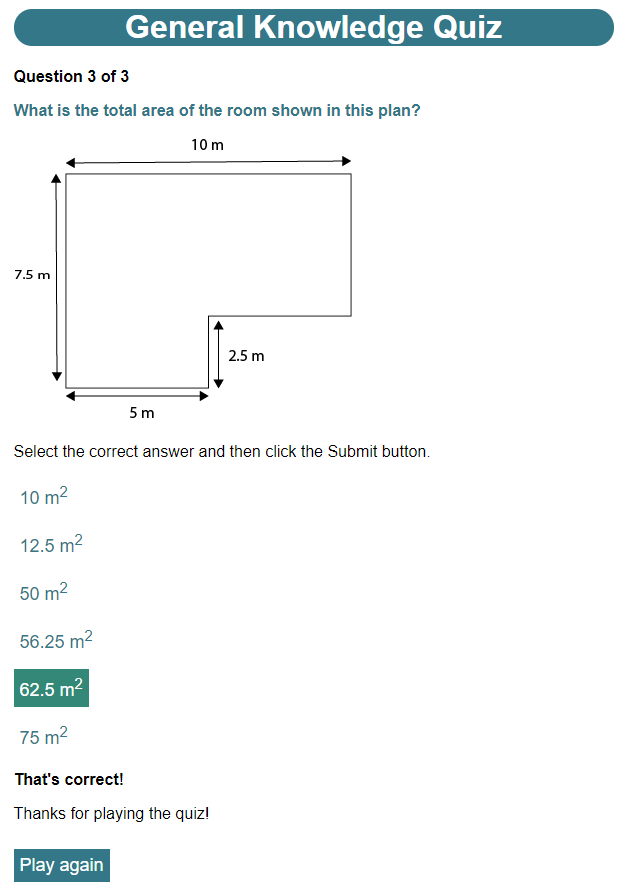
This time the end of quiz message is shown, along with the button to replay the quiz. The final thing I need to fix is to add the functionality for the See question x and Play again buttons. I set currentQuestion back to zero, then made these changes to initialiseQuiz:
  initialiseQuiz: function() {
    this.page = this.getPageElements();
    fetch('/data/quiz.json')
    .then(response => response.json())
    .then(json => {
      this.quizData = json;
      this.page.submit.addEventListener('click', this.checkAnswer);
      this.page.nextQuestion.addEventListener('click', function() {
        quiz.showNextQuestion(false);
      });
      this.page.replay.addEventListener('click', function() {
        quiz.showNextQuestion(true);
      });
      this.updatePage();
    })
    .catch(error => {
      console.error('Error: ',  error);
    });
  },
I’m adding two event listeners, one on lines 12 – 14 for the next question button and one on lines 15 – 17 for the replay button. There are two things to note. Firstly, like the event handler for the submit button, I’m adding these in initialiseQuiz rather than updatePage because they only need to be set once. Secondly, I’m using an anonymous function to contain the call to the showNextQuestion function so I can pass an argument to that function. I’ll add that function now, putting it between the setSubmitState function and the getPageElements function.
  showNextQuestion: function(reset) {
    // Remove existing answer options
    while (quiz.page.options.firstChild) {
      quiz.page.options.removeChild(quiz.page.options.firstChild);
    }

    // Show next question (or first if resetting)
    quiz.currentQuestion = reset ? 0 : quiz.currentQuestion + 1;
    quiz.updatePage();
  },
The first thing I need to do in this function is remove any existing answer options from the page. If I don’t do this, when I rebuild the page for the next question, the new answer options will just get added to the existing options from the previous question.
To do this, I’m using a new form of loop. The while loop starts with a condition and will only execute its body while that condition is true. For the condition, I’m checking the firstChild property of the options div. The firstChild property will return a reference to the first child element of the specified parent element, or null if the parent element has no children. This will evaluate to true if a reference is returned, or false if null is returned. In other words, this loop will keep executing until the options div has no children (i.e. no answer options).
The body of the loop contains just a single statement, which uses the removeChild function. This will remove the specified child from the specified parent.
Having done that, the next task is to get the number of the question I should be going to. This is either one more than the current question number, if I’m going to the next question, or 0 if I’m replaying the quiz. This is determined by the single parameter, reset, which should be false for navigation to the next question and true if I’m resetting for a replay. Note that I’m using a ternary operator again here to set this. Once I’ve set the correct number for the next question, I simply call the updatePage function again.
By refreshing the page in the browser and working through the quiz, I found that the See question x button took me on to the next question and the Play again button at the end successfully took me back to the first question.
I’m almost done with my quiz, but before I move on to a new game, here are a couple of final challenges I’ve set myself. The first is to further test the functionality of the quiz, and the robustness of the JSON data format, by adding two new questions to the quiz. One will be a single-answer type question and the other a multiple-answer type question and one will also include an image.
The second challenge I set myself, has two parts:
- Allow the user just two attempts to get the correct answer. If the user fails to answer correctly on a second attempt, they must move on to the next question.
- Add a scoring system that awards 2 points for a question answered correctly on the first attempt, 1 point for a question answered correctly on the second attempt and 0 points for a question that has not been answered correctly after the second attempt. When the question has been answered correctly, or after a second incorrect attempt, let the user know what they scored for that question. After the final question, show the user their total score and the maximum possible score, e.g. for a five question quiz they might see something like “You scored 7 out of 10 points”
I’ll show my solutions in the next post.
Be First to Comment